
이 사이트에 댓글을 남기면, 즉시 표시되지 않고 관리자의 검토 승인 후 댓글이 표시됩니다.
스팸댓글 등의 이유로 이렇게 사용중이니, 댓글 남긴 후 작성한 댓글이 보이지 않아도 다시 작성할 필요가 없습니다.
참고 하여 주시기 바랍니다.
7월 05
[공지] 댓글 작성에 관해서.
2월 11 2025
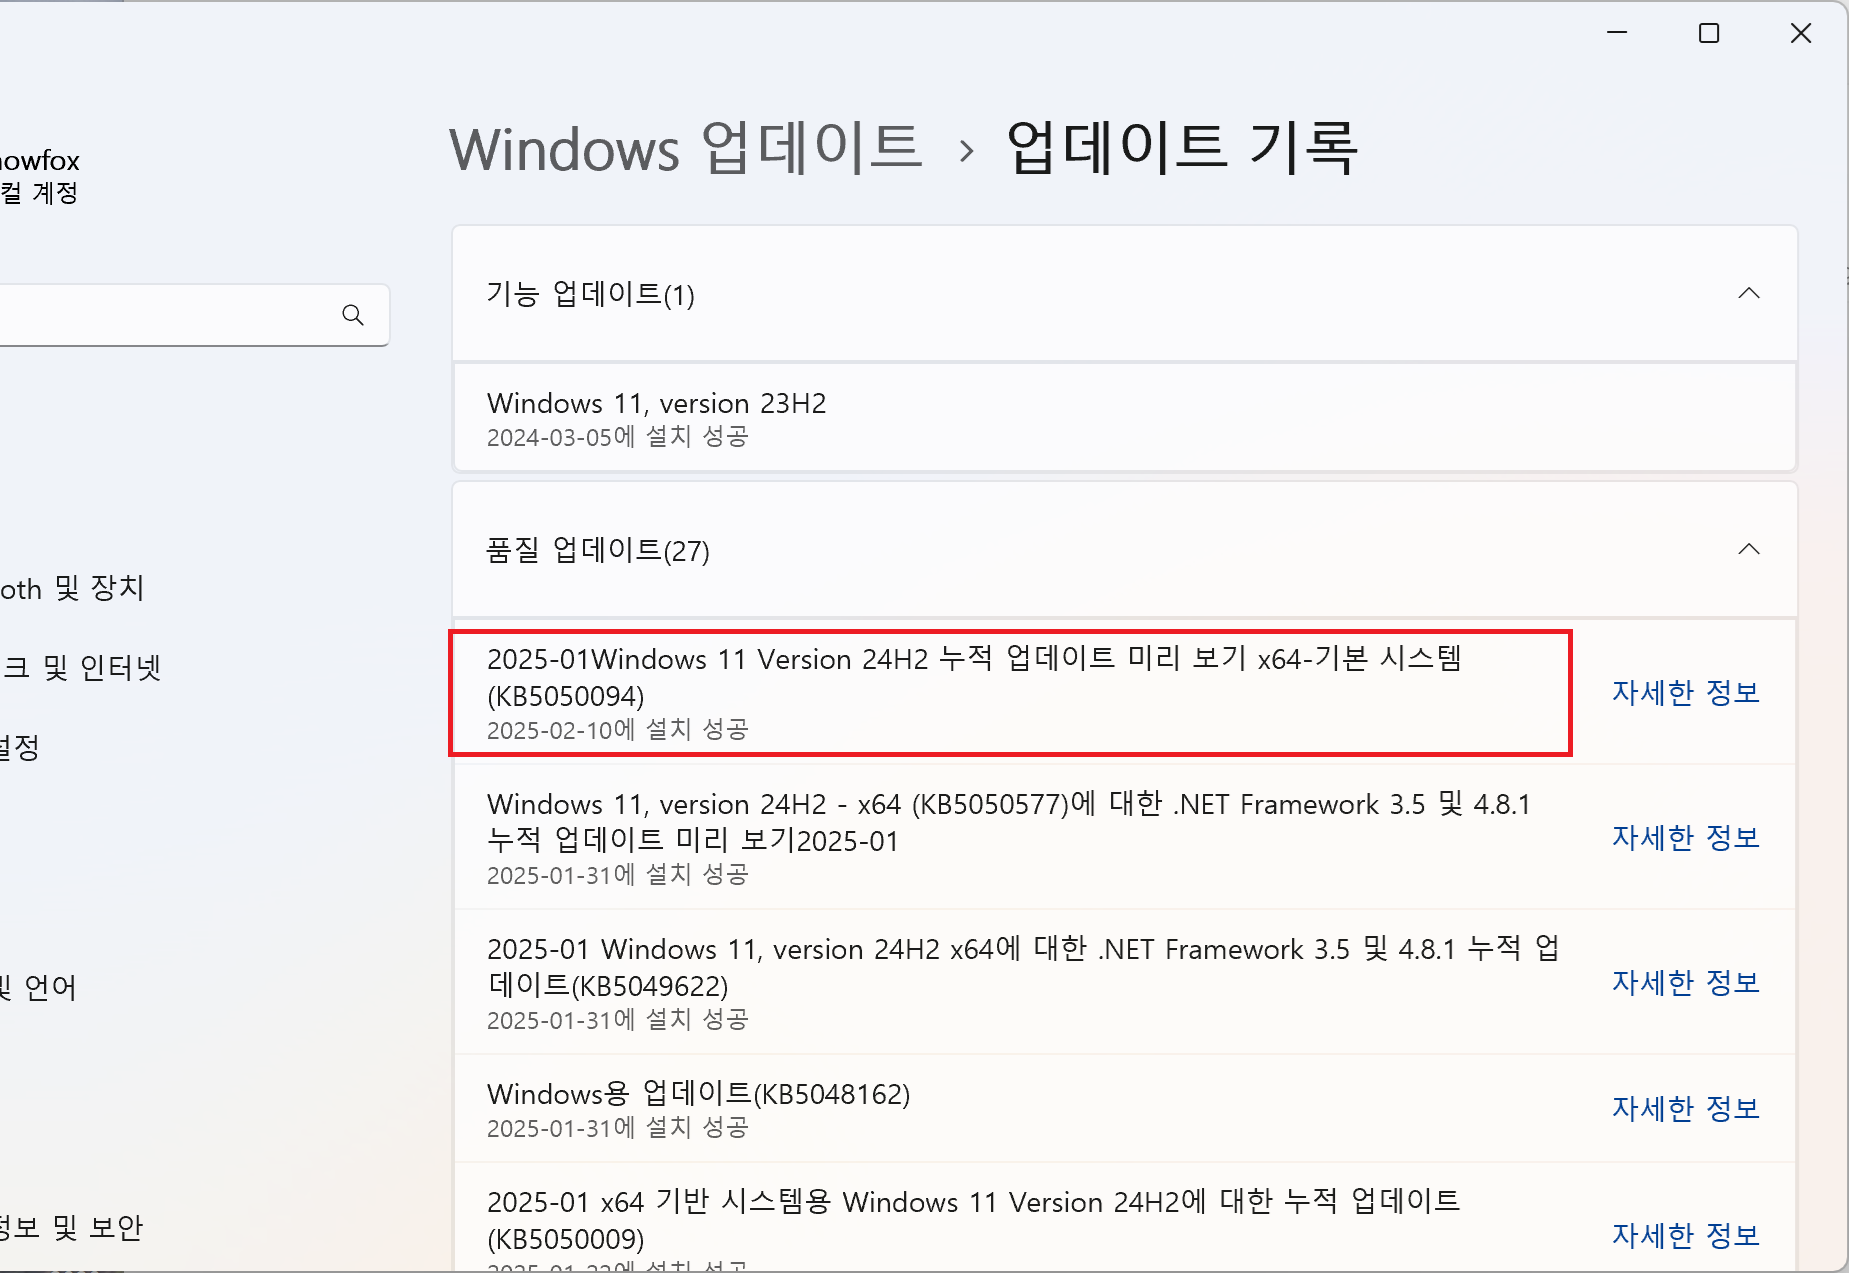
windows 11 WPA2-Enterprise 인증시 키보드 입력 안되는 문제.
윈도우11에서 기업용 wifi 인증시 키보드 입력이 안되는 문제.
windows 11의 wpa2-enterprise 방식 인증을 사용 할 때, 아래 화면에서 키보드 입력이 안되며 관련 화면이 정지(?)되는 문제가 발생했다.
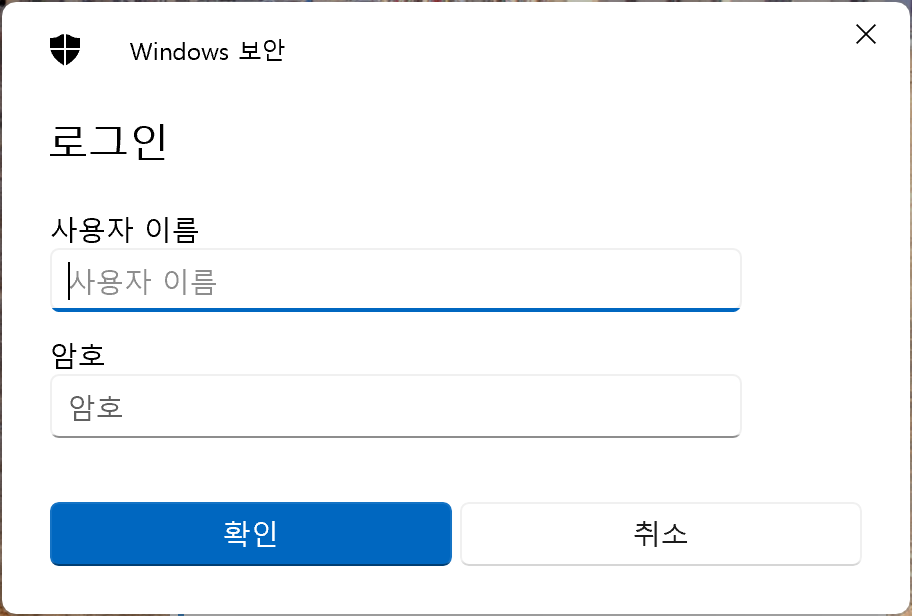
KB5050094 업데이트를 설치한 후에 이상 증상이 사라졌다.
1월 15 2025
시스코 스위치 stack 문제 – 무한 재부팅
시스코 스위치 stack 에서 제거한 member 스위치의 무한 재부팅 문제.
스택에서 정상적으로 unprovision 하지 않은 스위치는 아래 처럼 무한 재부팅을 하게 된다.
Initializing Hardware...

System Bootstrap, Version 17.14.1r [FC1], RELEASE SOFTWARE (P)
Compiled Fri 12/15/2023 14:15:51 by rel

Current ROMMON image : Primary
C9200L-48P-4X platform with 2097152 Kbytes of main memory

boot: attempting to boot from [flash:packages.conf]
boot: reading file packages.conf

##############

Waiting for 120 seconds for other switches to boot
###
Switch number is 1
All switches in the stack have been discovered. Accelerating discovery

Chassis 1 reloading, reason - Active/standby selection failed in 1+1 Mode
Jan  3 01:37:15.267: %PMAN-5-EXITACTION: C0/0: pvp: Process manager is exiting: reload cc action requested
Jan  3 01:37:15.799: %PMAN-5-EXITACTION: F0/0: pvp: Process manager is exiting: reload fp action requested
Jan  3 01:37:20.612: %PMAN-5-EXITACTION: R0/0: pvp: Process manager is exiting: rp processes exit with reload switch code


Initializing Hardware...

System Bootstrap, Version 17.14.1r [FC1], RELEASE SOFTWARE (P)
Compiled Fri 12/15/2023 14:15:51 by rel

Current ROMMON image : Primary
C9200L-48P-4X platform with 2097152 Kbytes of main memory

boot: attempting to boot from [flash:packages.conf]
boot: reading file packages.conf

##############
1월 05 2025
리눅스 guest-vm의 btrfs 파일 시스템 늘이기
리눅스 VM 게스트 OS의 btrfs 파일시스템 늘이기
1. VMware vm을 편집해서 디스크 용량을 증설한다.
vm웨어 설정은 리눅스 파일시스템 늘이기 – vmware guest os. 를 참고하면 된다.
2. parted -l 로 증가된 디스크 용량 확인한다.
[root@cloud ~]# parted -l
Model: VMware Virtual disk (scsi)
Disk /dev/sda: 34.4GB
Sector size (logical/physical): 512B/512B
Partition Table: msdos
Disk Flags:

Number  Start   End     Size    Type     File system     Flags
 1      1049kB  257MB   256MB   primary  xfs             boot
 2      257MB   2257MB  2000MB  primary  linux-swap(v1)
 3      2257MB  17.2GB  14.9GB  primary  btrfs
12월 06 2024
윈도우 10 바탕화면에서 마우스 오른쪽 버튼 클릭 문제.
윈도우10 바탕화면에서 마우스 오른쪽 버튼을 클릭 했을때, 탐색기가 다시 실행되는 문제가 발생했다.
증상은, 마우스 오른쪽 버튼 클릭 했을 때 바탕화면이 잠깐 없어졌다 다시 나타며 메뉴가 나타나지 않음. 알고보니 윈도우 탐색기가 다시 실행되는 증상이었다. 이 증상은 다른 폴더에서는 발생하지 않고 오직 바탕화면에서만 발생했다.
아래 문서를 참고하여 문제를 해결하였다.
원인은, 프로그램들이 설치되면서, 마우스 오른쪽 클릭 했을 때 메뉴에 나타나도록 변경하는데, 이 중에서 문제가 발생하는듯 하다. 내 경우는 nvidia 관련 프로그램과 v3 가 문제를 발생시켰다.
해결 방법은 shellexview 라는 프로그램을 설치하고, 윈도우 기본 프로그램을 제외한 나머지 프로그램들을 활성/비활성해보면서 문제를 발생시킨 프로그램을 찾는 방식이다.
ShellExView 다운로드:
https://www.tenforums.com/software-apps/13204-file-explorer-crashes-after-right-click-desktop.html
참고문서:
https://www.tenforums.com/software-apps/13204-file-explorer-crashes-after-right-click-desktop.html
10월 06 2024
시스코 스위치 TDR 테스트
시스코 스위치 TDR 테스트
TDR(Time Domain Reflectometer)은 전송 케이블에 신호를 보내고 그 신호가 반사되어 되돌아오는 시간을 측정하여 케이블의 결함 유무를 확인하는 방법이다.
시스코 스위치의 TDR 테스트는 아래와 같은 방법으로 실행 할 수 있으며, 광케이블은 TDR 테스트가 지원되지 않는다.
아래는 시스코 C9200L 스위치에서 실행했다. 스위치가 tdr 테스트를 지원하지 않을 수도 있다.
* 인터페이스 상태 확인하고, TDR 테스트를 실행할 포트를 확인한다.
Switch#sh int status
...
Gi2/0/36                        connected    trunk      a-full a-1000 10/100/1000BaseTX
Gi2/0/37                        connected    trunk      a-full  a-100 10/100/1000BaseTX
Gi2/0/38                        connected    trunk      a-full  a-100 10/100/1000BaseTX

Port         Name               Status       Vlan       Duplex  Speed Type
Gi2/0/39                        notconnect   1            auto   auto 10/100/1000BaseTX
Gi2/0/40                        notconnect   1            auto   auto 10/100/1000BaseTX
Gi2/0/41                        connected    trunk      a-full  a-100 10/100/1000BaseTX
Gi2/0/42                        notconnect   1            auto   auto 10/100/1000BaseTX
Gi2/0/43                        notconnect   1            auto   auto 10/100/1000BaseTX
Gi2/0/44                        notconnect   1            auto   auto 10/100/1000BaseTX
Gi2/0/45                        notconnect   1            auto   auto 10/100/1000BaseTX
Gi2/0/46                        notconnect   1            auto   auto 10/100/1000BaseTX
Gi2/0/47                        connected    trunk      a-full  a-100 10/100/1000BaseTX
Gi2/0/48                        notconnect   1            auto   auto 10/100/1000BaseTX
Te2/1/1                         notconnect   1            auto   auto unknown
Te2/1/2                         notconnect   1            auto   auto unknown
Te2/1/3                         notconnect   1            auto   auto unknown
Te2/1/4                         notconnect   1            auto   auto unknown
9월 20 2024
주니퍼 스위치 PoE 관련 명령어.
주니퍼 스위치 PoE 관련 명령어.
스위치 모델 : Juniper EX2300-48P
1. PoE 인터페이스 보기
admin@Switch> show poe interface
Interface    Admin       Oper    Pair/Mode  Max        Priority       Power          Class
             status      status  status     power                     consumption
 ge-0/0/0    Enabled      ON     2P/AT      30.0W      Low            4.2W            4
 ge-0/0/1    Enabled      ON     2P/AT      30.0W      Low            4.2W            4
 ge-0/0/2    Enabled      ON     2P/AT      30.0W      Low            4.2W            4

...


ge-0/0/46    Enabled     OFF     2P/AT      15.4W      Low            0.0W           not-applicable
ge-0/0/47    Enabled     OFF     2P/AT      15.4W      Low            0.0W           not-applicable

{master:0}
admin@Switch>
9월 10 2024
VMware guest vm OVF 내보내기/가져오기
vsphere vm OVF 내보내기(6.0)/가져오기(8.0)
vsphere 6.0에서 운영중인 VM 을 vsphere 8.0 사용중인 서버로 이동해야 할 일이 생겼다.
vm을 ovf 포맷으로 내보내고, 8.0 에서 ovf 파일을 가져오는 방법을 사용했다.
* OVF 포맷으로 내보내기
1. 이동하고자하는 vm의 전원을 끈다. 사용중이면 메뉴가 활성화되지 않는다.
해당 vm을 선택한다.

8월 31 2024
CentOS를 RedHat Enterprise 리눅스로 변환하는 방법
CentOS를 RedHat Enterprise 리눅스로 변환하는 방법
CentOS 특히 CentOS7의 지원 종료에 따라, VMware를 비롯한 가상머신에 배포된 centos를 rhel로 변환하기 위한 안내서.
https://www.redhat.com/en/resources/converting-centos-linux-to-enterprise-linux-overview
8월 29 2024
cisco 스위치 PoE 관련 명령어.
시스코 스위치(ios-xe) PoE 관련 명령어
1. poe 상태 확인
show power inline 명령으로 확인 할 수 있다.
Switch#show power inline

Module   Available     Used     Remaining
          (Watts)     (Watts)    (Watts)
------   ---------   --------   ---------
1           740.0       30.8       709.2
Interface Admin  Oper       Power   Device              Class Max
                            (Watts)
--------- ------ ---------- ------- ------------------- ----- ----
Gi1/0/1   auto   off        0.0     n/a                 n/a   30.0
Gi1/0/2   auto   off        0.0     n/a                 n/a   30.0
Gi1/0/3   auto   on         15.4    Ieee PD             4     30.0
Gi1/0/4   auto   off        0.0     n/a                 n/a   30.0
Gi1/0/5   auto   off        0.0     n/a                 n/a   30.0
Gi1/0/6   auto   off        0.0     n/a                 n/a   30.0
Gi1/0/7   auto   on         15.4    Ieee PD             4     30.0
Gi1/0/8   auto   off        0.0     n/a                 n/a   30.0
Gi1/0/9   auto   off        0.0     n/a                 n/a   30.0
Gi1/0/10  auto   off        0.0     n/a                 n/a   30.0

...
8월 09 2024
vCSA 6.0 cli 명령어로 설치하기.
vCSA 6.0 cli에서 명령어로 설치하기.
사용중이던 vCSA6.0이 아래처럼 인벤토리 서비스를 실행하지 못하는 현상이 발생하였다.
localhost:~ # service-control --all --status
....


 applmgmt (VMware Appliance Management Service) vmafdd (VMware Authentication Framework) vmcad (VMware Certificate Service) vmdird (VMware Directory Service) vmware-cis-license (VMware License Service) vmware-cm (VMware Component Manager) vmware-rhttpproxy (VMware HTTP Reverse Proxy) vmware-sca (VMware Service Control Agent) vmware-sts-idmd (VMware Identity Management Service) vmware-stsd (VMware Security Token Service) vmware-syslog (VMware Common Logging Service) vmware-syslog-health (VMware Syslog Health Service) vmware-vapi-endpoint (VMware vAPI Endpoint) vmware-vpostgres (VMware Postgres) vmware-vws (VMware System and Hardware Health Manager)
Running:
 applmgmt (VMware Appliance Management Service) vmafdd (VMware Authentication Framework) vmcad (VMware Certificate Service) vmdird (VMware Directory Service) vmware-cis-license (VMware License Service) vmware-cm (VMware Component Manager) vmware-rhttpproxy (VMware HTTP Reverse Proxy) vmware-sca (VMware Service Control Agent) vmware-sts-idmd (VMware Identity Management Service) vmware-stsd (VMware Security Token Service) vmware-syslog (VMware Common Logging Service) vmware-syslog-health (VMware Syslog Health Service) vmware-vapi-endpoint (VMware vAPI Endpoint) vmware-vpostgres (VMware Postgres) vmware-vws (VMware System and Hardware Health Manager)
INFO:root:Stopped:
 vmware-eam (VMware ESX Agent Manager) vmware-invsvc (VMware Inventory Service) vmware-mbcs (VMware Message Bus Configuration Service) vmware-netdumper (VMware vSphere ESXi Dump Collector) vmware-perfcharts (VMware Performance Charts) vmware-rbd-watchdog (VMware vSphere Auto Deploy Waiter) vmware-sps (VMware vSphere Profile-Driven Storage Service) vmware-vdcs (VMware Content Library Service) vmware-vpx-workflow (VMware vCenter Workflow Manager) vmware-vpxd (VMware vCenter Server) vmware-vsm (VMware vService Manager) vsphere-client ()
Stopped:
 vmware-eam (VMware ESX Agent Manager) vmware-invsvc (VMware Inventory Service) vmware-mbcs (VMware Message Bus Configuration Service) vmware-netdumper (VMware vSphere ESXi Dump Collector) vmware-perfcharts (VMware Performance Charts) vmware-rbd-watchdog (VMware vSphere Auto Deploy Waiter) vmware-sps (VMware vSphere Profile-Driven Storage Service) vmware-vdcs (VMware Content Library Service) vmware-vpx-workflow (VMware vCenter Workflow Manager) vmware-vpxd (VMware vCenter Server) vmware-vsm (VMware vService Manager) vsphere-client ()