CentOS를 RedHat Enterprise 리눅스로 변환하는 방법
CentOS 특히 CentOS7의 지원 종료에 따라, VMware를 비롯한 가상머신에 배포된 centos를 rhel로 변환하기 위한 안내서.
https://www.redhat.com/en/resources/converting-centos-linux-to-enterprise-linux-overview

8월 31 2024
CentOS를 RedHat Enterprise 리눅스로 변환하는 방법
CentOS 특히 CentOS7의 지원 종료에 따라, VMware를 비롯한 가상머신에 배포된 centos를 rhel로 변환하기 위한 안내서.
https://www.redhat.com/en/resources/converting-centos-linux-to-enterprise-linux-overview
8월 29 2024
시스코 스위치(ios-xe) PoE 관련 명령어
1. poe 상태 확인
show power inline 명령으로 확인 할 수 있다.
Switch#show power inline

Module   Available     Used     Remaining
          (Watts)     (Watts)    (Watts)
------   ---------   --------   ---------
1           740.0       30.8       709.2
Interface Admin  Oper       Power   Device              Class Max
                            (Watts)
--------- ------ ---------- ------- ------------------- ----- ----
Gi1/0/1   auto   off        0.0     n/a                 n/a   30.0
Gi1/0/2   auto   off        0.0     n/a                 n/a   30.0
Gi1/0/3   auto   on         15.4    Ieee PD             4     30.0
Gi1/0/4   auto   off        0.0     n/a                 n/a   30.0
Gi1/0/5   auto   off        0.0     n/a                 n/a   30.0
Gi1/0/6   auto   off        0.0     n/a                 n/a   30.0
Gi1/0/7   auto   on         15.4    Ieee PD             4     30.0
Gi1/0/8   auto   off        0.0     n/a                 n/a   30.0
Gi1/0/9   auto   off        0.0     n/a                 n/a   30.0
Gi1/0/10  auto   off        0.0     n/a                 n/a   30.0

...
8월 09 2024
vCSA 6.0 cli에서 명령어로 설치하기.
사용중이던 vCSA6.0이 아래처럼 인벤토리 서비스를 실행하지 못하는 현상이 발생하였다.
localhost:~ # service-control --all --status
....


 applmgmt (VMware Appliance Management Service) vmafdd (VMware Authentication Framework) vmcad (VMware Certificate Service) vmdird (VMware Directory Service) vmware-cis-license (VMware License Service) vmware-cm (VMware Component Manager) vmware-rhttpproxy (VMware HTTP Reverse Proxy) vmware-sca (VMware Service Control Agent) vmware-sts-idmd (VMware Identity Management Service) vmware-stsd (VMware Security Token Service) vmware-syslog (VMware Common Logging Service) vmware-syslog-health (VMware Syslog Health Service) vmware-vapi-endpoint (VMware vAPI Endpoint) vmware-vpostgres (VMware Postgres) vmware-vws (VMware System and Hardware Health Manager)
Running:
 applmgmt (VMware Appliance Management Service) vmafdd (VMware Authentication Framework) vmcad (VMware Certificate Service) vmdird (VMware Directory Service) vmware-cis-license (VMware License Service) vmware-cm (VMware Component Manager) vmware-rhttpproxy (VMware HTTP Reverse Proxy) vmware-sca (VMware Service Control Agent) vmware-sts-idmd (VMware Identity Management Service) vmware-stsd (VMware Security Token Service) vmware-syslog (VMware Common Logging Service) vmware-syslog-health (VMware Syslog Health Service) vmware-vapi-endpoint (VMware vAPI Endpoint) vmware-vpostgres (VMware Postgres) vmware-vws (VMware System and Hardware Health Manager)
INFO:root:Stopped:
 vmware-eam (VMware ESX Agent Manager) vmware-invsvc (VMware Inventory Service) vmware-mbcs (VMware Message Bus Configuration Service) vmware-netdumper (VMware vSphere ESXi Dump Collector) vmware-perfcharts (VMware Performance Charts) vmware-rbd-watchdog (VMware vSphere Auto Deploy Waiter) vmware-sps (VMware vSphere Profile-Driven Storage Service) vmware-vdcs (VMware Content Library Service) vmware-vpx-workflow (VMware vCenter Workflow Manager) vmware-vpxd (VMware vCenter Server) vmware-vsm (VMware vService Manager) vsphere-client ()
Stopped:
 vmware-eam (VMware ESX Agent Manager) vmware-invsvc (VMware Inventory Service) vmware-mbcs (VMware Message Bus Configuration Service) vmware-netdumper (VMware vSphere ESXi Dump Collector) vmware-perfcharts (VMware Performance Charts) vmware-rbd-watchdog (VMware vSphere Auto Deploy Waiter) vmware-sps (VMware vSphere Profile-Driven Storage Service) vmware-vdcs (VMware Content Library Service) vmware-vpx-workflow (VMware vCenter Workflow Manager) vmware-vpxd (VMware vCenter Server) vmware-vsm (VMware vService Manager) vsphere-client ()
7월 23 2024
시스코 스위치 ios-xe 업그레이드
스위치: 시스코 C9200L-48-TX
OS: ios-xe 17.03.05
작업 내용: ios-xe 17.03.05 버전을 17.09.04a 버전으로 업그레이드
현재 스위치는 4대가 스택으로 구성되어 있다.
BoxCorea-1F#show switch
Switch/Stack Mac Address : f8e9.4f81.a780 - Local Mac Address
Mac persistency wait time: Indefinite
                                             H/W   Current
Switch#   Role    Mac Address     Priority Version  State
-------------------------------------------------------------------------------------
*1       Active   f8e9.4f81.a780     15     V03     Ready
 2       Standby  3c8b.7f82.3000     14     V03     Ready
 3       Member   3c8b.7f85.2880     13     V03     Ready
 4       Member   f8e9.4f52.ec00     12     V03     Ready
참고사항: 스택 구성된 스위치나, 단독 구성된 스위치나 업그레이드 방법은 동일하다.
6월 10 2024
postgresql 기초 사용법 – 처음 사용해봄.
*작업환경
OS: ubuntu 22.04
PostgreSQL: 14.12
1. 데이터베이스 접속.
데이터베이스에 접속하기위해서는 postgres 계정을 이용한다. 리눅스 패키지로 설치한 경우에는 postgres 계정이 만들어져 있다.
su 명령으로 계정을 전환한다.
$ sudo su - postgres
데이터베이스에 접속하기 위해 psql 명령을 사용한다.
$ psql
psql (14.12 (Ubuntu 14.12-0ubuntu0.22.04.1))
Type "help" for help.

postgres=#
5월 31 2024
주니퍼 vEX 스위치 OSPF(open shortest path first) 설정하기.
* 시험환경: eve-ng.
사용 스위치: Juniper vEX 스위치, cisco vIOS 스위치
R1, R2, R3 : 주니퍼 vEX 스위치
Switch-1, Switch-2: 시스코 vIOS 스위치
구성은 아래 처럼.
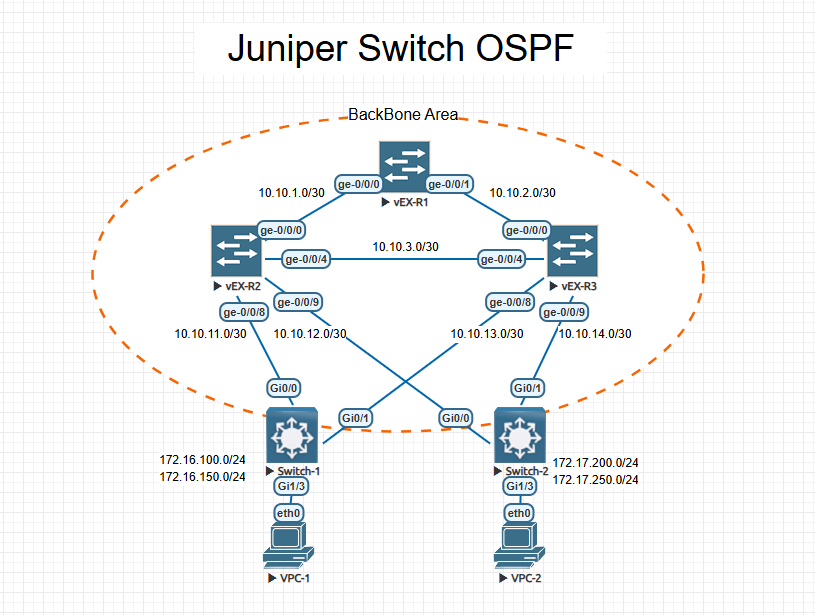
1. R1 설정(Designated Router)
각 라우터와 연결된 인터페이스 설정
[edit]
root@R1# set interfaces ge-0/0/0 unit 0 family inet address 10.10.1.1/30

[edit]
root@R1# set interfaces ge-0/0/1 unit 0 family inet address 10.10.2.1/30
ospf 설정. cisco의 process id 개념은 없다.
root@R1# set protocols ospf area 0.0.0.0 interface ge-0/0/0

[edit]
root@R1# set protocols ospf area 0.0.0.0 interface ge-0/0/1
5월 22 2024
주니퍼 스위치 VRRP(Virtual Router Redundancy Protocol) 설정하기.
* 작업환경:
eve-ng 커뮤니티 버전, 주니퍼 vEX 스위치.
* 구성 : 아래 그림과 같이 시험환경 구성.
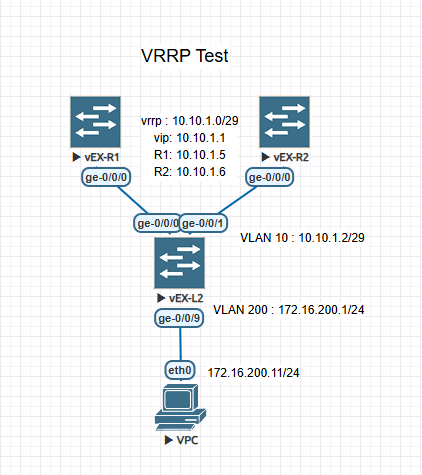
1. 스위치1, 스위치2의 vrrp 설정.
1.1. R1 스위치 설정
L2 스위치와 연결된 인터페이스에 IP 주소와 VRRP설정을한다.
[edit]
root# set interfaces ge-0/0/0 unit 10 family inet address 10.10.1.5/29 vrrp-group 10 virtual-address 10.10.1.1 priority 250 accept-data
5월 16 2024
주니퍼 스위치 static 라우팅 설정.
작업환경: eve-ng, vEX 스위치
구성은 아래 그림과 같음.
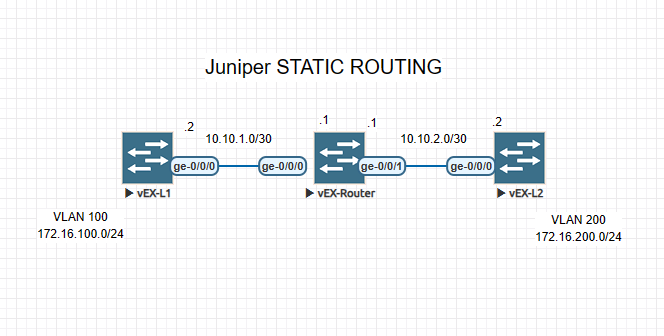
1. Router 설정.
하단 스위치와 연결된 인터페이스에 IP 주소를 설정한다.
[edit]
root# set system host-name vEX-Router

[edit]
root@vEX-Router# set interfaces ge-0/0/0 unit 0 family inet address 10.10.1.1/30

[edit]
root@vEX-Router# set interfaces ge-0/0/1 unit 0 family inet  address 10.10.2.1/30

[edit]
root@vEX-Router# commit
commit complete
각 네트워크로 라우팅을 설정한다.
[edit]
root@vEX-Router# set routing-options static route 172.16.100.0/24  next-hop 10.10.1.2

[edit]
root@vEX-Router# set routing-options static route 172.16.200.0/24  next-hop 10.10.2.2

[edit]
root@vEX-Router# commit
commit complete
5월 13 2024
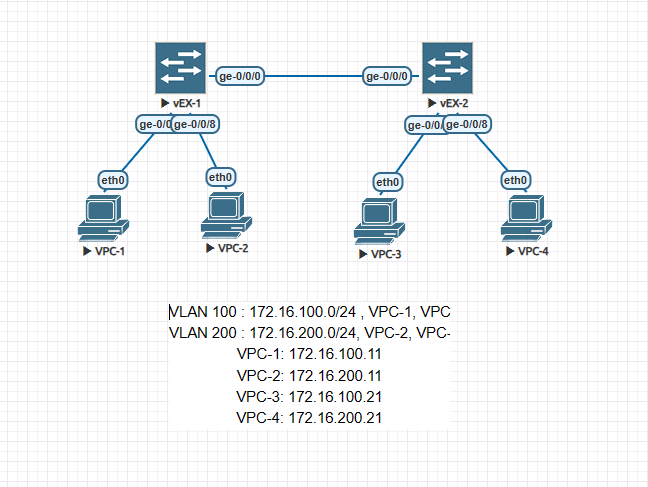
[eve-ng labs.]주니퍼 junos 기초.
* 시험 환경: eve-ng 커뮤니티 버전, 주니퍼 vEX 스위치.
구성은 아래그림처럼.
junos에서, 설정 및 설정 확인은 set, delete, commit, show 명령어를 이용한다.
set : 설정, 설정 변경
delete : 설정 제거
commit : 변경사항 적용, 저장
show : 설정 확인.
1. 로그인, root 비밀번호 설정 그리고 설정 저장.
부팅후 로그인 ID: root, 비밀번호 없음.
login: root
Last login: Sun Mar 19 08:08:06 on ttyu0

--- JUNOS 23.1R1.8 Kernel 64-bit  JNPR-12.1-20230307.3e7c4b6_buil
root@:~ #
부팅후 아래 메시지 반복됨.
Auto Image Upgrade: To stop, on CLI apply
"delete chassis auto-image-upgrade"  and commit

Auto Image Upgrade: No DHCP Client in bound state, reset all DHCP clients

Auto Image Upgrade: DHCP INET Client State Reset : fxp0.0

Auto Image Upgrade: DHCP INET6 Client State Reset : fxp0.0
위의 명령어를 실행하려면 root 비밀번호가 설정되어 있어야한다.
cli 모드로(operation mode) 변경
root@:~ # cli
설정 모드(configuration mode)로 변경
root> configure
Entering configuration mode

[edit]
root#
이제, root 비밀번호를 설정한다.
root# set system root-authentication plain-text-password
New password:
Retype new password:
위의 업그레이드 메시지가 반복되지 않도록, 아래 명령어를 실행한다.
[edit]
root# delete chassis auto-image-upgrade
설정을 적용하기 위해 commit 명령을 입력한다.
[edit]
root# commit
commit complete
4월 28 2024
우분투 리눅스에서 python3, django, oracle 19c 사용하기.
* 작업 환경
OS: ubuntu 22.04
ip address : 172.30.124.211 (오라클 설치된 서버 아님)
python: python3.10.12
oracle client: 설치됨.
django: 5.0.4
Oracle 데이터베이스 : SCAN IP 172.30.124.241, 172.30.124.242,172.30.124.243
* 주의사항
cx_Oracle 패키지를 설치하면 오라클 클라이언트없이 파이썬 스크립트를 작성하고 실행할 수 있다.
하지만 Django 프로그램에서 오라클 데이터베이스를 사용하려면, 오라클 클라이언트가 설치되어 있어야 한다.
오라클 클라이언트 설치는 아래 글을 참고하면 된다.
https://blog.boxcorea.com/wp/archives/3700
1. cx_Oracle 패키지 설치.
(venv) $ pip install cx_oracle
Collecting cx_oracle
...
2. 테스트 코드 작성
import cx_Oracle

def test_oracle():
    dsn_tns = cx_Oracle.makedsn(host='172.30.124.242', port='1521', service_name='orcl')
    con = cx_Oracle.connect(user='fox', password='fox123', dsn=dsn_tns)
    cur = con.cursor()
    cur.execute('select * from test')
    for i in cur:
        print(i)
    cur.close()
    con.close()


if __name__ == '__main__':
    test_oracle()
코드 실행 결과 이상 없이 잘 실행됨.
(venv) $ python main.py
(2, 'snowfox')
(1, 'poss')