
[eve-ng labs.]주니퍼 junos 기초.
* 시험 환경: eve-ng 커뮤니티 버전, 주니퍼 vEX 스위치.
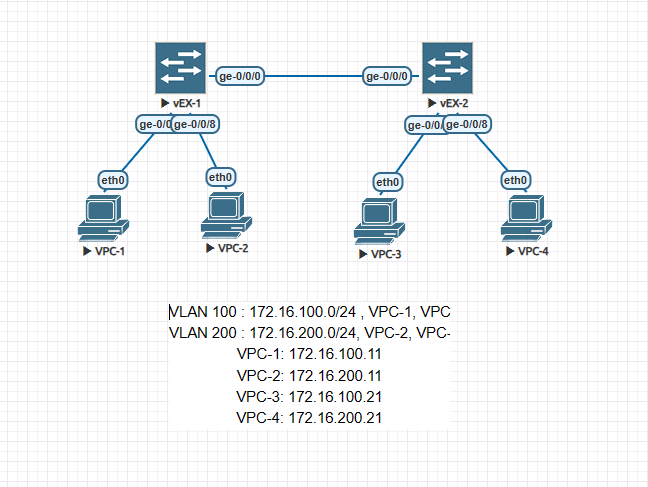
구성은 아래그림처럼.
junos에서, 설정 및 설정 확인은 set, delete, commit, show 명령어를 이용한다.
set : 설정, 설정 변경
delete : 설정 제거
commit : 변경사항 적용, 저장
show : 설정 확인.
1. 로그인, root 비밀번호 설정 그리고 설정 저장.
부팅후 로그인 ID: root, 비밀번호 없음.
login: root
Last login: Sun Mar 19 08:08:06 on ttyu0

--- JUNOS 23.1R1.8 Kernel 64-bit  JNPR-12.1-20230307.3e7c4b6_buil
root@:~ #
부팅후 아래 메시지 반복됨.
Auto Image Upgrade: To stop, on CLI apply
"delete chassis auto-image-upgrade"  and commit

Auto Image Upgrade: No DHCP Client in bound state, reset all DHCP clients

Auto Image Upgrade: DHCP INET Client State Reset : fxp0.0

Auto Image Upgrade: DHCP INET6 Client State Reset : fxp0.0
위의 명령어를 실행하려면 root 비밀번호가 설정되어 있어야한다.
cli 모드로(operation mode) 변경
root@:~ # cli
설정 모드(configuration mode)로 변경
root> configure
Entering configuration mode

[edit]
root#
이제, root 비밀번호를 설정한다.
root# set system root-authentication plain-text-password
New password:
Retype new password:
위의 업그레이드 메시지가 반복되지 않도록, 아래 명령어를 실행한다.
[edit]
root# delete chassis auto-image-upgrade
설정을 적용하기 위해 commit 명령을 입력한다.
[edit]
root# commit
commit complete
2. 호스트네임 변경
설정모드로 진입 후 set system host-name [HOSTNAME] 명령으로 변경한다.
root@:~ # cli
root> configure
Entering configuration mode
The configuration has been changed but not committed

[edit]
root# set system host-name Fox1

[edit]
root# commit
commit complete

[edit]
root@Fox1# exit
Exiting configuration mode

root@Fox1>
3. ssh 접속 설정 및 사용자 등록
ssh 서비스 설정.
[edit]
root@Fox1# set system services ssh
설정확인
설정 모드에서,
[edit]
root@Fox1# run show configuration system services
ssh;
또는 cli 모드에서
root@Fox1> show configuration system services
ssh;
사용자 등록 (id: admin)
[edit]
root@Fox1# set system login user admin class super-user authentication plain-text-password
New password:
Retype new password:

[edit]
root@Fox1# commit
commit complete
4. 현재 시간 확인 및 time zone 설정
cli 에서 show system uptime 명령의 결과에서 현재시간 확인 가능함.
root@Fox1> show system uptime
Current time: 2024-05-09 02:28:17 UTC
Time Source:  LOCAL CLOCK
System booted: 2024-05-07 02:21:07 UTC (2d 00:07 ago)
Protocols started: 2024-05-07 02:26:04 UTC (2d 00:02 ago)
Last configured: 2024-05-09 02:20:46 UTC (00:07:31 ago) by root
 2:28AM  up 2 days, 7 mins, 1 users, load averages: 1.93, 0.96, 0.75
또는, 리눅스 쉘에 접속하여 리눅스 명령어 date로도 확인 가능
root@Fox1> start shell
root@Fox1:~ # date
Thu May  9 02:29:19 UTC 2024
timezone이 UTC로 되어 있으므로, KST로 변경한다.
root@Fox1> configure
Entering configuration mode

[edit]
root@Fox1# set system time-zone Asia/Seoul

[edit]
root@Fox1# commit
commit complete

[edit]
root@Fox1# run show system uptime
Current time: 2024-05-09 11:33:21 KST
Time Source:  LOCAL CLOCK
System booted: 2024-05-07 11:21:07 KST (2d 00:12 ago)
Protocols started: 2024-05-07 11:26:04 KST (2d 00:07 ago)
Last configured: 2024-05-09 11:33:14 KST (00:00:07 ago) by root
11:33AM  up 2 days, 12 mins, 1 users, load averages: 0.99, 0.97, 0.81
참고로 쉘에서도 변경 가능하나, timedatectl 같은 유틸리티가 없어서 아래처럼 고전적인(?) 방법을 사용해야 한다.
KST로 변경된 시간이 보이지 않으면 다시 로그인하면 timezone 이 변경된 시간을 볼 수 있다.
root@Fox2> start shell
root@Fox2:~ # ln -sf /usr/share/zoneinfo/Asia/Seoul /var/etc/localtime
root@Fox2:~ # ln -sf /var/etc/localtime /etc/localtime
root@Fox2:~ # date
Thu May  9 11:38:18 KST 2024
root@Fox2:~ # exit
exit

root@Fox2> show system uptime
Current time: 2024-05-09 11:38:35 KST
Time Source:  LOCAL CLOCK
System booted: 2024-05-07 11:21:09 KST (2d 00:17 ago)
Protocols started: 2024-05-07 11:26:10 KST (2d 00:12 ago)
Last configured: 2024-05-09 11:23:53 KST (00:14:42 ago) by root
11:38AM  up 2 days, 17 mins, 1 users, load averages: 0.42, 0.66, 0.67
5. 인터페이스 보기
기본적으로, show interfaces 명령을 사용한다. 간결하게 보기위해 뒤에 terse 옵션을 붙인다.
root@Fox1> show interfaces terse
Interface               Admin Link Proto    Local                 Remote
ge-0/0/0                up    up
ge-0/0/0.16386          up    up
lc-0/0/0                up    up
lc-0/0/0.32769          up    up   vpls
pfe-0/0/0               up    up
pfe-0/0/0.16383         up    up   inet
                                   inet6
pfh-0/0/0               up    up
pfh-0/0/0.16383         up    up   inet
pfh-0/0/0.16384         up    up   inet
ge-0/0/1                up    up
ge-0/0/1.16386          up    up
ge-0/0/2                up    up
ge-0/0/2.16386          up    up
ge-0/0/3                up    up
ge-0/0/3.16386          up    up
ge-0/0/4                up    up
ge-0/0/4.16386          up    up
ge-0/0/5                up    up
ge-0/0/5.16386          up    up
ge-0/0/6                up    up
ge-0/0/6.16386          up    up
ge-0/0/7                up    up
ge-0/0/7.16386          up    up
ge-0/0/8                up    up
ge-0/0/8.16386          up    up
ge-0/0/9                up    up
ge-0/0/9.16386          up    up
cbp0                    up    up
demux0                  up    up
dsc                     up    up
em1                     up    up
em1.0                   up    up   inet     10.0.0.4/8
                                            128.0.0.1/2
                                            128.0.0.4/2
                                   inet6    fe80::5254:ff:fe12:bdfe/64
                                            fec0::a:0:0:4/64
                                   tnp      0x4
esi                     up    up
fxp0                    up    up
fxp0.0                  up    up   inet
                                   inet6    fe80::5200:ff:fe01:0/64
gre                     up    up
ipip                    up    up
irb                     up    up
jsrv                    up    up
jsrv.1                  up    up   inet     128.0.0.127/2
lo0                     up    up
lo0.16384               up    up   inet     127.0.0.1           --> 0/0
lo0.16385               up    up   inet
lsi                     up    up
mif                     up    up
mtun                    up    up
pimd                    up    up
pime                    up    up
pip0                    up    up
pp0                     up    up
rbeb                    up    up
tap                     up    up
vtep                    up    up
6. vlan 만들기
vlan id 100, vlan id 200을 WHITE, BLACK이라는 이름으로 만든다.
[edit]
root@Fox1# set vlans WHITE vlan-id 100

[edit]
root@Fox1# set vlans BLACK vlan-id 200
스위치간 연결포트(ge-0/0/0)을 tagged 포트로 만든다.
[edit]
root@Fox1# set interfaces ge-0/0/0 unit 0 family ethernet-switching vlan members 100

[edit]
root@Fox1# set interfaces ge-0/0/0 unit 0 family ethernet-switching vlan members 200

[edit]
root@Fox1# set interfaces ge-0/0/0 unit 0 family ethernet-switching interface-mode trunk

[edit]
root@Fox1# commit
commit complete
각 인터페이스에 VLAN을 할당한다.
port 1~4는 vlan 100, port 5~8은 vlan 200에 할당한다.
하나의 포트를 vlan 에 할당하려면 위의 명령어처럼 할당하면 된다. 여러개의 포트를 한번에 설정하려면
설정하려는 포트를 그룹으로 만들어야 한다.
1~4번 포트르르 M1 그룹으로 만들고, 5~9번 포트는 M2 그룹으로 만든 후, M1 그룹에는 vlan 100, M2 그룹은 vlan 200을 설정한다.
[edit]
root@Fox1# set interfaces interface-range M1  member-range ge-0/0/1 to ge-0/0/4

[edit]
root@Fox1# set interfaces interface-range M2 member-range ge-0/0/5 to ge-0/0/9

[edit]
root@Fox1# set interfaces interface-range M1 unit 0 family  ethernet-switching vlan members WHITE

[edit]
root@Fox1# set interfaces interface-range M2 unit 0 family  ethernet-switching vlan members BLACK
[edit]

root@Fox1# commit
commit complete
설정한 vlan 확인
root@Fox1> show vlans

Routing instance        VLAN name             Tag          Interfaces
default-switch          BLACK                 200
                                                           ge-0/0/0.0*
                                                           ge-0/0/5.0*
                                                           ge-0/0/6.0*
                                                           ge-0/0/7.0*
                                                           ge-0/0/8.0*
                                                           ge-0/0/9.0*
default-switch          WHITE                 100
                                                           ge-0/0/0.0*
                                                           ge-0/0/1.0*
                                                           ge-0/0/2.0*
                                                           ge-0/0/3.0*
                                                           ge-0/0/4.0*
default-switch          default               1
설정후, 같은 VLAN에 연결된 vpc끼리 통신확인(vpc-4, vpc-2).
VPCS> show ip

NAME        : VPCS[4]
IP/MASK     : 172.16.200.21/24
GATEWAY     : 0.0.0.0
DNS         :
MAC         : 00:50:79:66:68:06
LPORT       : 20000
RHOST:PORT  : 127.0.0.1:30000
MTU         : 1500

VPCS> ping 172.16.200.11

84 bytes from 172.16.200.11 icmp_seq=1 ttl=64 time=1.621 ms
84 bytes from 172.16.200.11 icmp_seq=2 ttl=64 time=1.611 ms
84 bytes from 172.16.200.11 icmp_seq=3 ttl=64 time=1.806 ms
84 bytes from 172.16.200.11 icmp_seq=4 ttl=64 time=1.604 ms
84 bytes from 172.16.200.11 icmp_seq=5 ttl=64 time=1.560 ms
vlan 인터페이스를 만들고 IP 주소 설정.
RVI(Routed Vlan Interface) 인터페이스를 VLAN에 할당하고, RVI 인터페이스에 IP 주소를 설정한다.
[edit]
root@Fox1# set vlans WHITE l3-interface irb.1


[edit]
root@Fox1# set interfaces irb unit 1 family inet address 172.16.100.1/24

[edit]
root@Fox1# set vlans BLACK l3-interface irb.2

[edit]
root@Fox1# set interfaces irb unit 2 family inet address 172.16.200.1/24

[edit]
root@Fox1# commit
commit complete
7. mac 주소 확인
root@Fox1> show ethernet-switching table

MAC flags (S - static MAC, D - dynamic MAC, L - locally learned, P - Persistent static, C - Control MAC
           SE - statistics enabled, NM - non configured MAC, R - remote PE MAC, O - ovsdb MAC
           GBP - group based policy)


Ethernet switching table : 4 entries, 4 learned
Routing instance : default-switch
    Vlan                MAC                 MAC         Age   GBP     Logical                NH        RTR
    name                address             flags             Tag     interface              Index     ID
    BLACK               00:50:79:66:68:04   D             -            ge-0/0/8.0             0         0
    BLACK               00:50:79:66:68:06   D             -            ge-0/0/0.0             0         0
    WHITE               00:50:79:66:68:03   D             -            ge-0/0/4.0             0         0
    WHITE               00:50:79:66:68:05   D             -            ge-0/0/0.0             0         0

root@Fox1>
8. arp 확인.
root@Fox1> show arp
MAC Address       Address         Name                      Interface               Flags
02:00:00:00:00:10 128.0.0.16      fpc0                      em1.0                   none
00:50:79:66:68:05 172.16.100.21   172.16.100.21             irb.1 [ge-0/0/0.0]      none
00:50:79:66:68:04 172.16.200.11   172.16.200.11             irb.2 [ge-0/0/8.0]      none
Total entries: 3

root@Fox1>
9. 하드웨어 점검 및 확인(실제 기계에서)
> show chassis environment
Class Item                           Status     Measurement
Power FPC 0 Power Supply 0           OK
Temp  FPC 0 CPU Sensor               OK         38 degrees C / 100 degrees F
      FPC 0 PSU Sensor               OK         39 degrees C / 102 degrees F
Fans  FPC 0 Fan Tray 0 Fan 0         OK         Spinning at normal speed
      FPC 0 Fan Tray 1 Fan 0         OK         Spinning at normal speed
> show system alarms
No alarms currently active
> show chassis alarms
No alarms currently active
하드웨어 정보 보기.
 >show chassis hardware
Hardware inventory:
Item             Version  Part number  Serial number     Description
Chassis                                JW3622120127      EX2300-48P
Pseudo CB 0
Routing Engine 0          BUILTIN      BUILTIN           RE-EX2300-48P
FPC 0            REV 22   650-059961   JW3622120127      EX2300-48P
  CPU                     BUILTIN      BUILTIN           FPC CPU
  PIC 0          REV 22   BUILTIN      BUILTIN           48x10/100/1000 Base-T
  PIC 1          REV 22   650-059961   JW3622120127      4x10G SFP/SFP+
    Xcvr 0       REV 01   740-011614   2310131709        SFP-LX10
Power Supply 0                                           JPSU-850W-AC-AFO
Fan Tray 0                                               Fan Module, Airflow Out (AFO)
Fan Tray 1                                               Fan Module, Airflow Out (AFO)
2 comments
AMD 에 vmware 사용해서 junswitch 올리니까 활성화가 안되던데..혹시 베어메탈로 eve-ng 돌리시나요??
Author
VMware 사용합니다. 주니퍼스위치죠? 저는 vEX스위치로 구성해봤어요