리눅스에서 Veritas Cluster Server(VCS) 설치 및 사용 – part 2

리눅스에서 Veritas Cluster Server(VCS) 설치 및 사용 – part 2

이전글 리눅스에서 Veritas Cluster Server(VCS) 설치 및 사용 – part 1에서는 가장 간단한 2node VCS를 구성해 보았다.
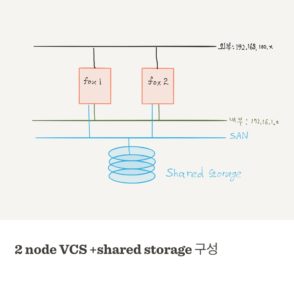
이제, 공유스토리지를 추가하고 서비스(apache web server)를 추가할 것이다. 공유스토리지는 리눅스 LVM을 사용할 것이다.
공유스토리지를 추가한 구성은 아래 그림과 같다.

VCS_storage
Continue reading

리눅스에서 Veritas Cluster Server(VCS) 설치 및 사용 – part 1

Veritas Cluster Server 설치 및 구성.

Veritas Cluster Server(이하 VCS)는 Symantec사의 HA(high-availability) 솔루션이다. VCS는 LLT(Low Latency Transport), GAB(Group Membership and Atomic Broadcast) 두가지 요소로 구성된다.

용어
LLT : 빠른 커널 대 커널 통신을 제공하고, 네트워크 연결을 모니터한다.
GAB : 노드들 사이에 동기화된 상태를 유지하기 위해 필요한 전체적으로 순서화된 메시지를 제공한다.

작업환경

Node1 : CentOS6.3 minimal 64bit, 외부 IP(eth0): 192.168.100.21, 내부 IP(eth1): 172.16.1.21, 호스트네임: fox1
Node2 : CentOS6.3 minimal 64bit, 외부 IP(eth0): 192.168.100.22, 내부 IP(eth1): 172.16.1.22, 호스트네임: fox2
Virtual IP : 192.168.100.20
VCS : 6.0.2

1. 설치전 요구패키지 및 확인사항(Node1, Node2 모두)
/etc/hosts화일을 아래와 같이 설정한다.

# cat /etc/hosts
192.168.100.21	fox1
192.168.100.22	fox2
192.168.100.20	fox_cluster

installer를 실행하고, Pre-Installation Check를 실행한다.

Continue reading

버추얼박스(VirtualBox) 에서 shared disk 만들기.

버추얼 박스를 이용하여 각 VM들 사이에 HA를 구성한다든지 할 때, shared storage가 꼭 필요한 경우가 있다. 실 구성에서야 별로 쓸모가 없겠지만, 시험용으로 사용할 때는 virtual box의 disk share 기능을 이용하면 간단히 해결 할 수 있다.

먼저, 두 linux guest를 사용한다.

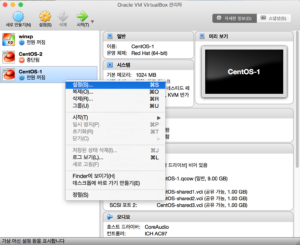
첫번째 VM의 설정을 선택한다.

vbox1

Continue reading

osx pmset 커맨드 사용예

osx pmset 커맨드는 power management 설정을 변경 할 수 있는 커맨드이다.

몇 가지 사용예를 보자면,

1. osx를 잠자기 모드.
잠자기 모드로 변경하려면,

# pmset sleepnow
Sleeping now...

반대로 잠자기모드로 들어가지 않도록 하려면,

# pmset noidle
Preventing idle sleep (^C to exit)...
^C

ctrl+c 를 누르기 전까지는 잠자기 모드로 들어가지 않는다.

Continue reading

Mac osx 하드웨어 정보 보기.

1. osx 시스템 버전 확인.

$ sw_vers
ProductName:	Mac OS X
ProductVersion:	10.11.4
BuildVersion:	15E65

Continue reading

aix, hba firmware 업그레이드 하기

AIX 7.1 에서, HBA 카드의 펌웨어 업그레이드 하기

1. 현재 hba카드의 firmware 확인

# lsmcode -c -d fcs1
The current microcode level for fcs2 is 210308
 
# lscfg -vl fcs1
  fcs1             U7879.001.DQDMFTP-P1-C1-T1  FC Adapter

        Part Number.................10N8620
        Serial Number...............1F8150CC82
        Manufacturer................001F
        EC Level....................A
        Customer Card ID Number.....5759
        FRU Number.................. 10N8620
        Device Specific.(ZM)........3
        Network Address.............10000000C9777D74
        ROS Level and ID............02C82138
        Device Specific.(Z0)........1036406D
        Device Specific.(Z1)........00000000
        Device Specific.(Z2)........00000000
        Device Specific.(Z3)........03000909
        Device Specific.(Z4)........FFC01159
        Device Specific.(Z5)........02C82138
        Device Specific.(Z6)........06C12138
        Device Specific.(Z7)........07C12138
        Device Specific.(Z8)........20000000C9777D74
        Device Specific.(Z9)........BS2.10X8
        Device Specific.(ZA)........B1F2.10X8
        Device Specific.(ZB)........B2F2.10X8
        Device Specific.(ZC)........00000000
        Hardware Location Code......U7879.001.DQDMFTP-P1-C1-T1

Z9항목이 firmware 버전을 보여준다. 2.10X8 이 현재 버전이다.

Continue reading

raspbian jessie swap 늘리기.

라즈베리파이2 B 모델에 raspbian jessie를 설치하면, swap이 기본적으로 100MB 설정되어 있다.(확인은 /proc/swaps 통해 할 수 있다).
swap은 파티션이 아닌 화일(/var/swap)로 사용하고 있음을 알 수 있다.

# cat /proc/swaps
Filename                                Type            Size    Used    Priority
/var/swap                               file            102396  16500   -1

swap file 설정은 /etc/dphys-swapfile에서 위치, 크기 등을 조정 할 수 있다. CONF_SWAPSIZE=100 을 주석처리하고, 원하는 크기로 변경한다. 나는 1024(1GB)로 변경했다.
Continue reading

aix etherchannel 구성하기.

1. EtherChannel 이란?

스위치의 여러개의 포트를 묶어 하나의 포트처럼 작동하게 하는 기술로, 넓은 대역폭을 확보하거나, 하나의 포트가 고장나도 작동하는데 이상이 없도록하는 기술이다. 스위치 제조사에 따라서, port trunking, port aggregation, teaming, bonding 등 여러가지 이름으로 사용된다.

Continue reading

apache2 mod_evasive로 DDoS 방어하기.

debian 계열 Linux에서 apache2 웹서버를 운영한다면, 간단한 방법으로 DDoS 공격을 차단 할 수 있다.

mod_evasive 를 사용하는 방법이다. mod_evasive는 따로 설치해 주어야 하며, debian 계열에서는 간단하게 설치가 가능하다.
Continue reading

Linux Docker.

참고문서:
https://docs.docker.com/engine/installation/ubuntulinux/
https://docs.docker.com/engine/userguide/
https://docs.docker.com/engine/userguide/basics/


I. 설치

1. 설치(ubuntu 14.04 에서).

아래 커맨드로, docker repository를 위한 pgp key를 등록한다.

# apt-key adv --keyserver hkp://pgp.mit.edu:80 --recv-keys 58118E89F3A912897C070ADBF76221572C52609D
Executing: gpg --ignore-time-conflict --no-options --no-default-keyring --homedir /tmp/tmp.fq7Qgn6cd8 --no-auto-check-trustdb --trust-model always --keyring /etc/apt/trusted.gpg --primary-keyring /etc/apt/trusted.gpg --keyserver hkp://pgp.mit.edu:80 --recv-keys 58118E89F3A912897C070ADBF76221572C52609D
gpg: requesting key 2C52609D from hkp server pgp.mit.edu
gpg: key 2C52609D: public key "Docker Release Tool (releasedocker) <docker@docker.com>" imported
gpg: Total number processed: 1
gpg:               imported: 1  (RSA: 1)

docker repository를 등록한다. /etc/apt/sources.list.d/docker.list 화일을(없으면 만들고) 아래와 같이 편집한다. os version이 ubuntu14.04이므로 trusty repository를 등록.

#vi /etc/apt/sources.list.d/docker.list
# Ubuntu Trusty
deb https://apt.dockerproject.org/repo ubuntu-trusty main

ubuntu 14.04 이전 버전에서는 설치 시 커널을 업그레이드 해 주어야 하지만, 여기서는 14.04 이기 때문에, 커널 업그레이드는 필요 하지 않다.

# apt-get install docker-engine
Reading package lists... Done
Building dependency tree
Reading state information... Done
The following extra packages will be installed:
  aufs-tools cgroup-lite git git-man liberror-perl
Suggested packages:
  git-daemon-run git-daemon-sysvinit git-doc git-el git-email git-gui gitk
  gitweb git-arch git-bzr git-cvs git-mediawiki git-svn
The following NEW packages will be installed:
  aufs-tools cgroup-lite docker-engine git git-man liberror-perl
0 upgraded, 6 newly installed, 0 to remove and 3 not upgraded.
Need to get 9,067 kB of archives.
After this operation, 50.4 MB of additional disk space will be used.
Do you want to continue? [Y/n]

Continue reading