
extreme switch stack 구성 – EasySetup 사용.
* 작업 스위치 모델: x440-24p
* 공장초기화 상태에서 진행함.
1. 스택 케이블 연결전 확인사항.
Stack 구성을 하면 설정이 삭제되므로, 명령을 내리기 전에 설정을 백업 받아둔다.
연결전 모든 스위치의 라이센스, OS 버전이 동일해야 한다.
OS 버전이 다르다면 동일하게 맞추어준다.(OS 업그레이드는 https://blog.boxcorea.com/wp/archives/2585 를 참고)
각각의 스위치에서 아래 명령으로 확인 한다.
라이센스 확인
* X440-24p.1 # show license
Enabled License Level:
        Edge
Enabled Feature Packs:
        None
OS버전확인
* X440-24p.2 # show version images
Card  Partition     Installation Date        Version     Name      Branch
------------------------------------------------------------------------------
Switch primary   Thu Dec 15 15:04:34 UTC 2016 16.2.2.4 summitX-16.2.2.4.xos 16.2.2.4
Switch secondary Thu Dec 15 15:04:34 UTC 2016 16.2.2.4 summitX-16.2.2.4.xos 16.2.2.4

* X440-24p.3 # show switch
..

Current State:    OPERATIONAL
Image Selected:   primary
Image Booted:     primary
Primary ver:      16.2.2.4
Secondary ver:    16.2.2.4

Config Selected:  NONE
Config Booted:    Factory Default
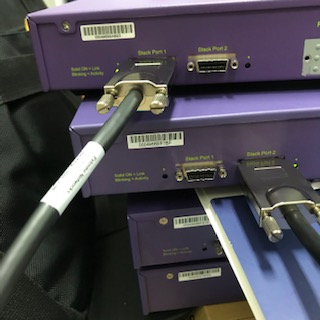
2. 스택 케이블을 연결하고(매뉴얼에는 전원을끄고 연결하라고 나오지만 전원켠 상태에서 연결했다) 상태를 확인한다. 케이블은 아래 사진처럼 교차로 연결한다.
* X440-24p.4 # show stacking
Stack Topology is a Daisy-Chain
This node is not in an Active Topology
Node MAC Address    Slot  Stack State  Role     Flags
------------------  ----  -----------  -------  ---
*00:04:96:8b:f7:bf  -     Disabled     Master   ---
 00:04:96:98:ab:e3  -     Disabled     Master   ---
* - Indicates this node
Flags:  (C) Candidate for this active topology, (A) Active Node
        (O) node may be in Other active topology
3. 스택으로 구성 할 모든 스위치에서 아래 명령을 내린다.
* X440-24p.5 # configure stacking protocol standard
This command will take effect at the next reboot of the specified node(s).
4. Master 노드로 사용할 스위치에 콘솔 접속하여 스택을 활성화한다. (EasySetup 을 사용하는 경우)
* X440-24p.2 # enable stacking
You have not yet configured all required stacking parameters.
Would you like to perform an easy setup for stacking operation? (y/N) Yes

Executing "configure stacking easy-setup" command...
For every node in the 2-node stack, this command will:
- enable stacking
- configure a stack MAC address
- choose and configure a slot number (this node will be assigned to slot 2)
- configure redundancy to none (slot 1 will be the master node)
- configure the stacking protocol to enhanced
Upon completion, the stack will automatically be rebooted into the new configuration.
Warning: If stacking is already configured, this command will alter that configuration.

Warning: This stack is a daisy chain.  It is highly recommended that the stack
be connected as a ring before running this command.

Warning: There are unsaved configuration changes.  You may wish to save them
before proceeding.

Do you wish to proceed? (y/N) Yes

Stacking configuration is complete.  Rebooting...
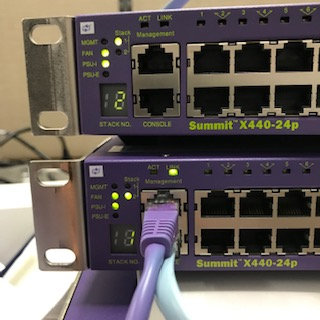
이제 재부팅이 끝나고 나면 스위치 전면 ‘Stack No.’ 에 노드 번호가 표시된다.
로그인 프롬프트가 login 으로 바뀔때까지 지루하지만 기다려야한다.
(pending-AAA) login:
Authentication Service (AAA) on the master node is now available for login.

login:
노드 1로 콘솔 접속하면 easysetup이 실행된다. (기본값을 입력하여 끝내고) 스택 상태를 확인해보면,
* Slot-1 Stack.3 # show stacking
Stack Topology is a Daisy-Chain
Active Topology is a Daisy-Chain
Node MAC Address    Slot  Stack State  Role     Flags
------------------  ----  -----------  -------  ---
*00:04:96:8b:f7:bf  1     Active       Master   CA-
 00:04:96:98:ab:e3  2     Active       Standby  CA-
* - Indicates this node
Flags:  (C) Candidate for this active topology, (A) Active Node
        (O) node may be in Other active topology
* Slot-1 Stack.4 # show slot
Slots    Type                 Configured           State       Ports
--------------------------------------------------------------------
Slot-1   X440-24p                                  Operational   24
Slot-2   X440-24p                                  Operational   24
Slot-3                                             Empty          0
Slot-4                                             Empty          0
Slot-5                                             Empty          0
Slot-6                                             Empty          0
Slot-7                                             Empty          0
Slot-8                                             Empty
노드2로 로그인하면 아래와 같은 프롬프트가 보인다.
login: admin
password:

ExtremeXOS
Copyright (C) 1996-2016 Extreme Networks. All rights reserved.
This product is protected by one or more US patents listed at http://www.extremenetworks.com/patents along with their foreign counterparts.
==============================================================================

You are connected to a Standby node.  Only a limited command set is supported.
You may use "telnet slot <slot_number>" to connect to the Master node to access
the full set of commands.

You are connected to a standby stack node's serial port.
Use "telnet slot <slot_number>" to connect to another node.

Press the <tab> or '?' key at any time for completions.
Remember to save your configuration changes.


* Slot-2 Stack.1 >
노드 1에서 설정 진행후 저장하고 재부팅하고 사용하면 된다.
* Slot-1 Stack.6 # save
No default configuration database has been selected to boot up the system.
Save configuration will set the new configuration as the default database.

Do you want to save configuration to primary.cfg? (y/N) Yes
Saving configuration on master ...................... done!
Saving configuration on Standbys (Slots: 2).

Configuration saved on Standby (Slot 2): done!

The selected configuration file is now "primary.cfg". By default, this file will be used for saving the configuration which will take effect after the next switch reboot.

Slot-1 Stack.7 # reboot
Are you sure you want to reboot the stack? (y/N) Yes
5. 스택 해체는 아래처럼!
* Slot-1 Stack.6 # disable stacking
This command will take effect at the next reboot of the specified node(s).
* Slot-1 Stack.7 # reboot
No default configuration database has been selected to boot up the system.
Save configuration will set the new configuration as the default database.

Do you want to save configuration changes to currently selected configuration
file (primary.cfg) and reboot?
(y - save and reboot, n - reboot without save, <cr> - cancel command) Yes
Saving configuration on master ................... done!
* 참고문서 :
https://gtacknowledge.extremenetworks.com/articles/How_To/How-to-create-stack-with-Summit-X460-48p-and-Summit-X460-24p
https://gtacknowledge.extremenetworks.com/articles/How_To/How-To-Install-a-New-Stackable-System-of-Up-to-Eight-Units