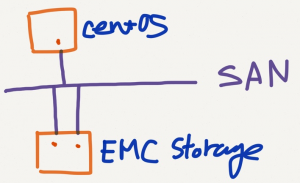
CentOS에 SAN 스토리지 연결하기.

작업환경

OS: CentOS7
HBA: Qlogic HBA 2 port 2/4g
Storage: EMC CX300
SAN 스위치: CISCO MDS 9148(기존 zoneset에 linux zone 추가)

1. HBA 장착후 인식 확인

# lspci | grep -i qlogic
07:00.0 Fibre Channel: QLogic Corp. ISP2432-based 4Gb Fibre Channel to PCI Express HBA (rev 03)
07:00.1 Fibre Channel: QLogic Corp. ISP2432-based 4Gb Fibre Channel to PCI Express HBA (rev 03)

커널에 드라이버가 로드되어 있는지 확인

# lsmod | grep qla
qla2xxx               593236  0
scsi_transport_fc      59960  1 qla2xxx

Continue reading

aix에 emc powerpath 패키지 설치.

구성환경
OS: AIX 6.1(6100-08-02-1316)
SAN: CISCO
Storage: EMC CX4-140

EMC        SAN s/w      SERVER
SPA------+----------+----HBA0
         |
SPB------+

1. 사전작업
AIX MPIO 파일셋이 설치되어 있는지 확인하고, 설치되어 있으면 제거한다.

disk 확인

# lsdev -Cc disk
hdisk0 Available 03-08-00-4,0 16 Bit LVD SCSI Disk Drive
hdisk1 Available 0A-08-00-5,0 16 Bit LVD SCSI Disk Drive
hdisk2 Available 0C-08-01     MPIO Other FC SCSI Disk Drive
hdisk3 Available 0C-08-01     MPIO Other FC SCSI Disk Drive
hdisk4 Available 0C-08-01     MPIO Other FC SCSI Disk Drive
hdisk5 Available 0C-08-01     MPIO Other FC SCSI Disk Drive
hdisk6 Available 0C-08-01     MPIO Other FC SCSI Disk Drive

Continue reading

ubuntu 12.04에 mhVTL 설치, 사용하기.

mhVTL 이란?
리눅스에서 표준 Tape Library를 에뮬레이션 해주는 오픈소스 VTL 프로그램이다.

작업환경: ubuntu 12.04 (32bit)

1. 설치
1.1. 다운로드

# wget https://sites.google.com/site/linuxvtl2/mhvtl-2014-04-13.tgz?attredirects=0
# mv mhvtl-2014-04-13.tgz?attredirects=0 mhvtl-2014-4-13.tgz

Continue reading

잘못만든 mirror 볼륨의 lp 이동하기.

환경: Aix6.1
VG: foxvg (mirror)
LV: foxlv2

foxlv2의 lp를 10개 늘이기위해 map을 만들고 extendlv 하였으나, 실수로 11개 늘인 상황.
이 경우, mirror관련 사항.

Continue reading

알아두면 유용한 hmc 커맨드

hmc에 ssh 접속하기위해서는 hmc콘솔의 web browser에서 해당 interface의 ssh접속을 허용해 놓아야 한다.

hmc 콘솔의 정보 보기

hscroot@localhost:~> lshmc -v
"vpd=*FC ????????
*VC 20.0
*N2 Thu Jul 24 10:47:38 KST 2014
*FC ????????
*DS Hardware Management Console
*TM 7042-CR6
*SE 0660F3C
*MN IBM
*PN Unknown
*SZ 4227448832
*OS Embedded Operating Systems
*NA 127.0.0.1
*FC ????????
*DS Platform Firmware
*RM V7R7.4.0.0
"

Continue reading

aix multipath failover

multi path 구성 스토리지와 연결했을때, 하나의 path가 끊겼다가 다시 연결되었을때 fail over 안될때 확인할 사항

링크가 단절되었을때,

# lspath -l hdisk6
Failed hdisk6 fscsi1
Enabled hdisk6 fscsi0

복구되어도 여전히 Failed 상태.

fscsi0의 속성값 확인 했을때, 아래와 같음.

# lsattr -El fscsi0
attach switch How this adapter is CONNECTED False
dyntrk       no           Dynamic Tracking of FC Devices        True+
fc_err_recov delayed_fail FC Fabric Event Error RECOVERY Policy True+

위의 두 속성을 바꿔준다.

# chdev -l fscsi0 -a fc_err_recov=fast_fail
Method error (/usr/lib/methods/chggen):
0514-029 Cannot perform the requested function because a
child device of the specified device is not in a correct state.

# chdev -l fscsi0 -a fc_err_recov=fast_fail -P
fscsi0 changed

# chdev -l fscsi0 -a dyntrk=yes -P
fscsi0 changed


# lsattr -El fscsi0
attach switch How this adapter is CONNECTED False
dyntrk       yes       Dynamic Tracking of FC Devices        True+
fc_err_recov fast_fail FC Fabric Event Error RECOVERY Policy True+


linux 스왑(swap) 늘리기

AWS를 이용중인 이 사이트를 최근에는 사용하기가 너무 힘들어 이것 저것 확인하던중 dmesg 에 아래와 같은 내용이 있는것을 확인.

[39212299.946048] Out of memory: Kill process 16823 (apache2) score 121 or sacrifice child
[39212299.946065] Killed process 16823 (apache2) total-vm:296504kB, anon-rss:73084kB, file-rss:0kB

가끔씩 mysql도 죽고하던 것이 생각났고, 위메시지를 보면, out of memory도 나고해서 메모리 사용량 확인.
Continue reading

iSCSI 설정과 사용하기 – ubuntu linux에서

Ubuntu Linux 에서 iSCSI 설정과 사용하기.

작업환경

OS: Ubuntu 12.04.4 LTS(32Bit version)
Box1: 192.168.0.51
Box2: 192.168.0.52

1. iSCSI Target 설정 (iSCSI 볼륨 만들 서버)
Box1 에 iSCSI volume을 만들기위해, 관련 패키지를 설치한다.

# apt-get install iscsitarget scsitarget-source iscsitarget-dkms

주의) 위의 패치지를 설치할때 dkms 부분에서 아래 처럼 make 오류가 발생한다. 버그없는 패키지를 받아서 수동으로 설치했다.

make KERNELRELEASE=3.11.0-15-generic -C /lib/modules/3.11.0-15-generic/build M=/var/lib/dkms/iscsitarget/1.4.20.2/build.....(bad exit status: 2)
Error! Bad return status for module build on kernel: 3.11.0-15-generic (i686)
# wget http://ftp.ubuntu.com/ubuntu/pool/universe/i/iscsitarget/iscsitarget_1.4.20.3+svn499-0ubuntu3_i386.deb
# wget http://ftp.ubuntu.com/ubuntu/pool/universe/i/iscsitarget/iscsitarget-dkms_1.4.20.3+svn499-0ubuntu3_all.deb
# dpkg -i iscsitarget_1.4.20.3+svn499-0ubuntu3_i386.deb
# dpkg -i iscsitarget-dkms_1.4.20.3+svn499-0ubuntu3_all.deb

아래화일에서 false로 되어 있는 부분을 true로 바꾼다.

# vi /etc/default/iscsitarget
ISCSITARGET_ENABLE=true

iSCSI 가 이용할 디스크(2GB)를 만든다. 여기서는 물리 디스크가 없으므로, image 화일을 하나 만들어서 가상의 하드디스크로 사용한다.(물리적인 하드디스크가 있으면 그것을 사용해도 무방하다).

# mkdir /iscsi
# dd if=/dev/zero of=/iscsi/d1.img bs=1024k count=2000
2000+0 records in
2000+0 records out
2097152000 bytes (2.1 GB) copied, 13.1235 s, 160 MB/s

만든 화일을 가상의 디스크로 등록한다.

# losetup /dev/loop0 /iscsi/d1.img

아래 화일에 아래와 같은 내용을 추가한다.(사용자id는 fox ,비밀번호는 fox123)

# vi /etc/iet/ietd.conf
Target iqn.2014-06.com.fox:storage.lun1
IncomingUser fox fox123
OutgoingUser
Lun 0 Path=/dev/loop0,Type=fileio
Alias LUN1

target 은 유일한 이름을 가져야하며, iSCSI 표준으로 iqn(iSCSI Qulified Name)형식이 있다. iqn의 형식은 아래와 같다.
iqn.yyyy-mm.[:identifier]

/etc/iet/initiators.allow 화일에서 iscsi 볼륨에 접근할 수 있는 서버를 설정해 준다. 기본은 ALL ALL이지만, Box2에서 만 사용하기 위해 아래와같이 설정을 바꾼다.

# vi /etc/iet/initiators.allow
# ALL ALL
iqn.2014-06.com.fox:storage.lun1 192.168.0.52

2. iSCSI initiator 설정 (iSCSI 볼륨을 이용할 서버)

open-iscsi를 설치한다.

# apt-get install open-iscsi

iscsi node에 자동으로 로그인할지를 설정한다. 기본값은 manual이다.

# vi /etc/iscsi/iscsid.conf
#node.startup = manual #주석처리
node.startup = automatic
# service open-iscsi start

iscsi target에 연결하고, 스토리지가 제공되는지 확인한다.

# iscsiadm -m discovery -t st -p fox1
192.168.0.51:3260,1 iqn.2014-06.com.fox:storage.lun1
# iscsiadm -m node
192.168.0.51:3260,1 iqn.2014-06.com.fox:storage.lun1

사용할 target에 대한 id와 password를 설정한다.(id는 fox, password는 fox123으로 설정했다.)

# iscsiadm -m node --targetname "iqn.2014-06.com.fox:storage.lun1" --portal "192.168.0.51:3260" --op=update --name node.session.auth.authmethod --value=CHAP
root@fox2:~#  iscsiadm -m node --targetname "iqn.2014-06.com.fox:storage.lun1" --portal "192.168.0.51:3260" --op=update --name node.session.auth.username --value=fox
root@fox2:~#  iscsiadm -m node --targetname "iqn.2014-06.com.fox:storage.lun1" --portal "192.168.0.51:3260" --op=update --name node.session.auth.password --value=fox123

위의 설정은 /etc/iscsi/nodes/iqn.2014-06.com.fox:storage.lun1/192.168.0.51,3260,1/default 화일에 저장되므로, 수동으로 설정해도 상관 없다.

설정을 마치고, iscsi initiator 서비스를 실행한다.

iscsi target에 로그아웃/로그인 하기

# iscsiadm -m node --targetname "iqn.2014-06.com.fox:storage.lun1" --portal "192.168.0.51" --logout
Logging out of session [sid: 2, target: iqn.2014-06.com.fox:storage.lun1, portal: 192.168.0.51,3260]
Logout of [sid: 2, target: iqn.2014-06.com.fox:storage.lun1, portal: 192.168.0.51,3260]: successful

# iscsiadm -m node --targetname "iqn.2014-06.com.fox:storage.lun1" --portal "192.168.0.51" --login
Logging in to [iface: default, target: iqn.2014-06.com.fox:storage.lun1, portal: 192.168.0.51,3260]
Login to [iface: default, target: iqn.2014-06.com.fox:storage.lun1, portal: 192.168.0.51,3260]: successful

로그인이 정상적으로 이루어지면, scsi 볼륨이 보일 것이다. 아래에서는 2GB /dev/sdb가 iscsi 볼륨이다. 화일시스템을 만들고 마운트하면, 정상적으로 사용할 수 있다.

# fdisk -l

Disk /dev/sda: 9663 MB, 9663676416 bytes
255 heads, 63 sectors/track, 1174 cylinders, total 18874368 sectors
Units = sectors of 1 * 512 = 512 bytes
Sector size (logical/physical): 512 bytes / 512 bytes
I/O size (minimum/optimal): 512 bytes / 512 bytes
Disk identifier: 0x0004d45b

   Device Boot      Start         End      Blocks   Id  System
/dev/sda1   *        2048    17825791     8911872   83  Linux
/dev/sda2        17827838    18872319      522241    5  Extended
/dev/sda5        17827840    18872319      522240   82  Linux swap / Solaris

Disk /dev/sdb: 2097 MB, 2097152000 bytes
65 heads, 62 sectors/track, 1016 cylinders, total 4096000 sectors
Units = sectors of 1 * 512 = 512 bytes
Sector size (logical/physical): 512 bytes / 512 bytes
I/O size (minimum/optimal): 512 bytes / 512 bytes
Disk identifier: 0x00000000

Disk /dev/sdb doesn't contain a valid partition table

참고 : CentOS 는 https://blog.boxcorea.com/wp/archives/1811

aix hacmp vg import 오류.

hacmp vg 관련 오류 처리

환경: aix 6.1, hacmp 6.1

오류 상황은 아래와 같다.

aix1, aix2 두 노드가 ha 설정되어 있으며, ha 실행되고 있는 상태.
aix1 에서 foxvg에 foxlv를 만들고(C-SPOC 사용하지 않음) 사용하다가 hacmp를 재시작(양쪽 node모두)했을때 아래 에러 발생
Continue reading

[스크랩] hp mc service guard 관련 커맨드

http://mailsinto.blogspot.kr/p/cluster-commands.html

HP mcservice guard 관련 커맨드가 위 사이트에 정리

Cluster 및 package 상태 보기

# cmviewcl –v

cluster 시작

# cmruncl

Continue reading