Nagios core에 시스코 스위치 등록하기.
설치는 이전 문서 ‘CentOS 8, Nagios core 설치‘를 참고하면 된다.
1. 시스코 스위치의 snmp 설정.
테스트를 위해 기본 설정만 하도록 한다. 커뮤니티 이름은 TEST이고 read only(RO)로 설정했다. 스위치 호스트네임은 System_Node다.
System_Node#conf t
System_Node(config)#snmp-server community TEST ro
System_Node(config)#end
설정확인
System_Node#show snmp community

Community name: TEST
Community Index: TEST
Community SecurityName: TEST
storage-type: nonvolatile	 active
2. switch.cfg를 사용가능하도록 nagios.cfg 파일을 수정.
nagios.cfg 파일(/opt 아래에 설치했다면, /opt/nagios/etc/nagios.cfg)에서 아래 내용의 주석을 제거한다.
# vi /opt/nagios/etc/nagios.cfg
변경전 아래 내용을 확인하고,
# Definitions for monitoring a router/switch
# cfg_file=/opt/nagios/etc/objects/switch.cfg
아래처럼 주석을 삭제해준다.
# Definitions for monitoring a router/switch
cfg_file=/opt/nagios/etc/objects/switch.cfg
3. nagios switche.cfg 파일에 모니터링 대상 스위치 등록. 호스트네임은 실제 호스트네임 대신, office로 바꿨다.(하다보니 그렇게 됨)
nagios 설치 위치가 /opt 인 경우, /opt/nagios/etc/objects 에 switch.cfg 파일이 위치한다.
# vi /opt/nagios/etc/objects/switch.cfg
호스트 설정.
define host {
    use                     generic-switch
    host_name               office
    alias                   C3560 switch
    address                 xxx.xxx.xxx.xxx
    hostgroups              switches
}
그룹은 따로 변경하지 않았다.
서비스 설정
원래 내용을 주석처리(#) 하고, 위에 설정한 호스트네임을 사용한다.
# Create a service to PING to switch
define service {

    use                     generic-service                     ; Inherit values from a template
    #host_name               linksys-srw224p                     ; The name of the host the service is associated with
    host_name               office
    service_description     PING                                ; The service description
    check_command           check_ping!200.0,20%!600.0,60%      ; The command used to monitor the service
    check_interval          5                                   ; Check the service every 5 minutes under normal conditions
    retry_interval          1                                   ; Re-check the service every minute until its final/hard state is determined
}


# Monitor uptime via SNMP

define service {

    use                     generic-service                     ; Inherit values from a template
    #host_name               linksys-srw224p
    host_name               office
    service_description     Uptime
    check_command           check_snmp!-C TEST -o sysUpTime.0
}

# Monitor ports Gi1/0/48

define service {
    use                     generic-service
    host_name               office
    service_description     UP Link port Bandwidth Usage
    check_command           check_snmp!-C TEST -o ifOperStatus.50 -m RFC1213-MIB
}
4. 설정파일 점검.
# /opt/nagios/bin/nagios -v /opt/nagios/etc/nagios.cfg

Nagios Core 4.4.6
Copyright (c) 2009-present Nagios Core Development Team and Community Contributors
Copyright (c) 1999-2009 Ethan Galstad
Last Modified: 2020-04-28
License: GPL

Website: https://www.nagios.org
Reading configuration data...
   Read main config file okay...
   Read object config files okay...

Running pre-flight check on configuration data...

Checking objects...
        Checked 11 services.
        Checked 2 hosts.
        Checked 2 host groups.
        Checked 0 service groups.
        Checked 1 contacts.
        Checked 1 contact groups.
        Checked 24 commands.
        Checked 5 time periods.
        Checked 0 host escalations.
        Checked 0 service escalations.
Checking for circular paths...
        Checked 2 hosts
        Checked 0 service dependencies
        Checked 0 host dependencies
        Checked 5 timeperiods
Checking global event handlers...
Checking obsessive compulsive processor commands...
Checking misc settings...

Total Warnings: 0
Total Errors:   0

Things look okay - No serious problems were detected during the pre-flight check
5. nagios 재실행
# systemctl restart nagios
6. 웹브라우저에서 확인
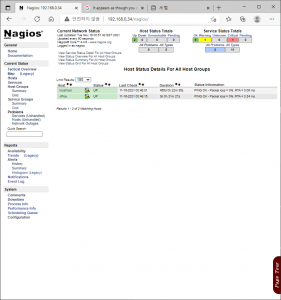
Host 메뉴를 눌러보면 그림처럼 2개의 호스트를 볼 수 있다. localhost는 nagios core를 설치한 서버이고, 다른 하나는 위에서 등록한 스위치다.
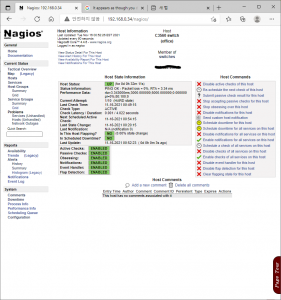
등록한 스위치 office를 눌러보면, 아래처럼 상태 정보를 볼 수 있다.

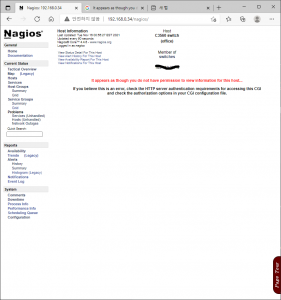
nagios 페이지에 접속해 본다. 만약 호스트 메뉴를 눌렀을때 아래 그림처럼 붉은 글씨로,
“It appears as though you do not have permission to view information for this host…” 라나온다면,

/opt/nagios/etc/cgi.cfg 에서, nagiosadmin 부분을 실제로 만든 사용자 id로 바꾸거나, 아니면, nagiosadmin을 등록해 준다.
* 기타사항
Nagios XI 소개 영상을 보면 대상 등록이 web UI를 통해 쉽게 하는 것을 볼 수 있는데, Nagios XI가 무료가 아니라 사용은 포기했다.
반면, nagios core는 오픈소스 프로그램이지만, 이것을 제대로 사용하려면 SNMP MIB에 대한 충분한 이해가 필요할 듯 하다. 다시 말해 부담없이 사용하기에 무리란 뜻.

