
[GNS3 Lab. – Cisco] 스위치(VLAN, VLAN 라우팅) 설정하기
작업환경
– GNS3 vm 시뮬레이터
– IOU L2 스위치, IOU L3 스위치(라우터)
* 참고사항
Layer2 스위치의 세가지 기능
– address learning
– Forward/filter 결정
– Loop 회피
스위치 – collision domain
라우터 – broadcast domain
스위치에서 broadcast domain을 나누기위해 VLAN을 이용한다. VLAN 사이에 통신을 원할 경우 라우터나 IVR(Inter-VLAN Routing)이 필요하다.
* 용어
Access port : 엑세스 포트는 한의 VLAN에 속하고 프래픽을 전달한다. 트래픽은 VLAN 정보(tagging) 없이 송수신 된다.
Trunk port : VLAN 정보가 추가된 프레임인 tagged 트래픽을 전달하는 포트. 여러 VLAN에 속할 수 있다.
– 802.1q trunking을 사용하면 vlan tag가 있는 트래픽과 vlan tag 없는 트래픽을 동시에 지원할 수 있다.
– 스위치 포트는 Access 포트나 trunk포트 중 하나로만 만들 수 있고 둘 다 사용할 수는 없다.
VLAN identification(VLAN 식별) : 어떤 프레임이 어떤 VLAN에 속하는지 구별하는 방법으로 하나 이상의 trunking 방법이 있다.
– ISL(Inter-Switch Link)은 VLAN 정보를 이더넷 프레임에 태그하는 방법.시스코에서만 사용한다.
– IEEE802.1q – 실제로 필드를 프레임에 끼워넣어 VLAN을 식별하는 방법.
ROAS(Router on a Stick) – 하나의 라우터 인터페이스를 여러 논리 인터페이스로 나누어 VLAN간 라우팅하는 방법.
IVR – L3 스위치에 논리 인터페이스를 구성해서 VLAN간 라우팅을 하는 방법으로 라우터가 필요하지 않으며, 외부라우터를 이용하는 것보다 효율적이다.
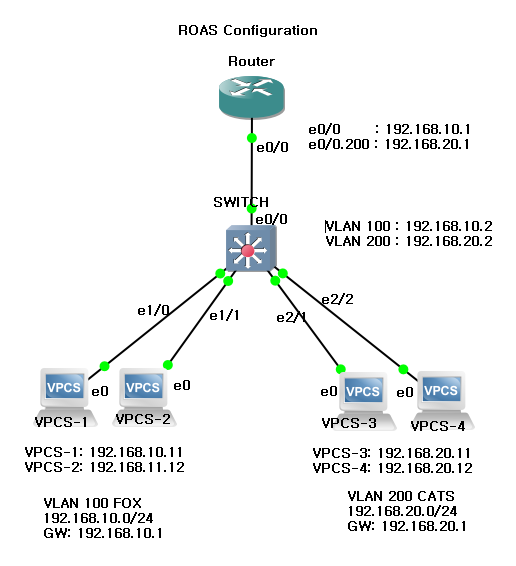
ROAS 구성
아래처럼 L2스위치 하나와 라우터 한개로, ROAS 구성을 한다.
1. VLAN 만들기
FOX, CATS 두개의 VLAN을 아래와 같이 만든다.
SWITCH#conf t
Enter configuration commands, one per line.  End with CNTL/Z.
SWITCH(config)#vlan 100
SWITCH(config-vlan)#name FOX
SWITCH(config-vlan)#exit
SWITCH(config)#vlan 200
SWITCH(config-vlan)#name CATS
SWITCH(config-vlan)#end
SWITCH#
show vlan 명령어로 vlan 확인.
SWITCH#sh vlan

VLAN Name                             Status    Ports
---- -------------------------------- --------- -------------------------------
1    default                          active    Et0/0, Et0/1, Et0/2, Et0/3
                                                Et1/0, Et1/1, Et1/2, Et1/3
                                                Et2/0, Et2/1, Et2/2, Et2/3
                                                Et3/0, Et3/1, Et3/2, Et3/3
100  FOX                              active
200  CATS                             active
1002 fddi-default                     act/unsup
1003 token-ring-default               act/unsup
1004 fddinet-default                  act/unsup
1005 trnet-default                    act/unsup

VLAN Type  SAID       MTU   Parent RingNo BridgeNo Stp  BrdgMode Trans1 Trans2
---- ----- ---------- ----- ------ ------ -------- ---- -------- ------ ------
1    enet  100001     1500  -      -      -        -    -        0      0
100  enet  100100     1500  -      -      -        -    -        0      0
200  enet  100200     1500  -      -      -        -    -        0      0
1002 fddi  101002     1500  -      -      -        -    -        0      0
1003 tr    101003     1500  -      -      -        -    -        0      0
1004 fdnet 101004     1500  -      -      -        ieee -        0      0
1005 trnet 101005     1500  -      -      -        ibm  -        0      0

Primary Secondary Type              Ports
------- --------- ----------------- ------------------------------------------
VLAN 1은 기본 VLAN으로 변경, 삭제 이름 변경을 할 수 없다. 또한 설정하지 않으면 모든 포트는 VLAN 1에 속해 있다.
show vlan 명령어는 access port 만 보여주기 때문에, trunk 포트는 보여주지 않는것에 주의해야 한다.
show interface trunk 명령으로 trunk포트를 확인해보면, trunk포트가 구성되지 않아서 아무것도 볼 수 없다.
SWITCH#show interface trunk
2. VLAN에 스위치 포트 할당하기(access port)
위 구성에서 스위치의 e1/0, e1/1은 VLAN 100에, e2/1, e2/2는 VLAN 200에 속해 있다. 해당 포트를 access port 로 vlan에 할당 하도록 한다.
SWITCH#conf t
Enter configuration commands, one per line.  End with CNTL/Z.
SWITCH(config)#int e1/0
SWITCH(config-if)#switchport mode access
SWITCH(config-if)#switchport access vlan 100
SWITCH(config-if)#int e1/1
SWITCH(config-if)#switchport mode access
SWITCH(config-if)#switchport access vlan 100
SWITCH(config-if)#end
SWITCH#
VLAN을 확인해 보면, e1/0, e1/1 포트가 VLAN 100에 할당된 것을 확인할 수 있다.
SWITCH#show vlan

VLAN Name                             Status    Ports
---- -------------------------------- --------- -------------------------------
1    default                          active    Et0/0, Et0/1, Et0/2, Et0/3
                                                Et1/2, Et1/3, Et2/0, Et2/1
                                                Et2/2, Et2/3, Et3/0, Et3/1
                                                Et3/2, Et3/3
100  FOX                              active    Et1/0, Et1/1
200  CATS                             active
1002 fddi-default                     act/unsup
1003 token-ring-default               act/unsup
1004 fddinet-default                  act/unsup
1005 trnet-default                    act/unsup

VLAN Type  SAID       MTU   Parent RingNo BridgeNo Stp  BrdgMode Trans1 Trans2
---- ----- ---------- ----- ------ ------ -------- ---- -------- ------ ------
1    enet  100001     1500  -      -      -        -    -        0      0
100  enet  100100     1500  -      -      -        -    -        0      0
200  enet  100200     1500  -      -      -        -    -        0      0
1002 fddi  101002     1500  -      -      -        -    -        0      0
1003 tr    101003     1500  -      -      -        -    -        0      0
1004 fdnet 101004     1500  -      -      -        ieee -        0      0
1005 trnet 101005     1500  -      -      -        ibm  -        0      0

Primary Secondary Type              Ports
------- --------- ----------------- ------------------------------------------
show interface e1/0 switchport 명령으로 해당포트가 속한 VLAN과 access 포트인지 trunk포트인지 확인 할 수 있다.
WITCH#sh int e1/0 switchport
Name: Et1/0
Switchport: Enabled
Administrative Mode: static access
Operational Mode: static access
Administrative Trunking Encapsulation: negotiate
Operational Trunking Encapsulation: native
Negotiation of Trunking: Off
Access Mode VLAN: 100 (FOX)
Trunking Native Mode VLAN: 1 (default)
Administrative Native VLAN tagging: enabled
Voice VLAN: none
Administrative private-vlan host-association: none
Administrative private-vlan mapping: none
Administrative private-vlan trunk native VLAN: none
Administrative private-vlan trunk Native VLAN tagging: enabled
Administrative private-vlan trunk encapsulation: dot1q
Administrative private-vlan trunk normal VLANs: none
Administrative private-vlan trunk associations: none
Administrative private-vlan trunk mappings: none
Operational private-vlan: none
Trunking VLANs Enabled: ALL
Pruning VLANs Enabled: 2-1001
Capture Mode Disabled
Capture VLANs Allowed: ALL

Appliance trust: none
SWITCH#
이제 VPCS-3,과 VPCS-4가 연결된 포트를 VLAN 200에 할당한다. 이때, 연속된 여러 포트를 한번에 설정 할 수 있다. 아래처럼 range를 이용한다.
SWITCH#conf t
Enter configuration commands, one per line.  End with CNTL/Z.

SWITCH(config)#int range e2/0-3
SWITCH(config-if-range)#switchport mode access
SWITCH(config-if-range)#switchport access vlan 200
SWITCH(config-if-range)#end
SWITCH#
show interface status 명령어로 확인해 본다.
SWITCH#sh int status

Port      Name               Status       Vlan       Duplex  Speed Type
Et0/0                        connected    1            auto   auto unknown
Et0/1                        connected    1            auto   auto unknown
Et0/2                        connected    1            auto   auto unknown
Et0/3                        connected    1            auto   auto unknown
Et1/0                        connected    100          auto   auto unknown
Et1/1                        connected    100          auto   auto unknown
Et1/2                        connected    1            auto   auto unknown
Et1/3                        connected    1            auto   auto unknown
Et2/0                        connected    200          auto   auto unknown
Et2/1                        connected    200          auto   auto unknown
Et2/2                        connected    200          auto   auto unknown
Et2/3                        connected    200          auto   auto unknown
Et3/0                        connected    1            auto   auto unknown
Et3/1                        connected    1            auto   auto unknown
Et3/2                        connected    1            auto   auto unknown
Et3/3                        connected    1            auto   auto unknown
3. Trunk port 만들기
라우터가 연결된 e0/0 포트를 포함해서, e0/3번 포트까지 trunk port로 설정한다.
SWITCH# conf t
Enter configuration commands, one per line.  End with CNTL/Z.
SWITCH(config)#int range e0/0-3
SWITCH(config-if-range)#switchport trunk encapsulation dot1q
SWITCH(config-if-range)#switchport mode trunk
SWITCH(config-if-range)#end
SWITCH#
인터페이스를 확인해본다.
SWITCH#sh int e0/0 switchport
Name: Et0/0
Switchport: Enabled
Administrative Mode: trunk
Operational Mode: trunk
Administrative Trunking Encapsulation: dot1q
Operational Trunking Encapsulation: dot1q
Negotiation of Trunking: On
Access Mode VLAN: 1 (default)
Trunking Native Mode VLAN: 1 (default)
Administrative Native VLAN tagging: enabled
Voice VLAN: none
Administrative private-vlan host-association: none
Administrative private-vlan mapping: none
Administrative private-vlan trunk native VLAN: none
Administrative private-vlan trunk Native VLAN tagging: enabled
Administrative private-vlan trunk encapsulation: dot1q
Administrative private-vlan trunk normal VLANs: none
Administrative private-vlan trunk associations: none
Administrative private-vlan trunk mappings: none
Operational private-vlan: none
Trunking VLANs Enabled: ALL
Pruning VLANs Enabled: 2-1001
Capture Mode Disabled
Capture VLANs Allowed: ALL

Appliance trust: none
show int trunk 명령으로도 확인해 본다.
SWITCH#sh int trunk

Port        Mode             Encapsulation  Status        Native vlan
Et0/0       on               802.1q         trunking      1
Et0/1       on               802.1q         trunking      1
Et0/2       on               802.1q         trunking      1
Et0/3       on               802.1q         trunking      1

Port        Vlans allowed on trunk
Et0/0       1-4094
Et0/1       1-4094
Et0/2       1-4094
Et0/3       1-4094

Port        Vlans allowed and active in management domain
Et0/0       1,100,200
Et0/1       1,100,200
Et0/2       1,100,200
Et0/3       1,100,200

Port        Vlans in spanning tree forwarding state and not pruned
Et0/0       1,100,200
Et0/1       1,100,200
Et0/2       1,100,200

Port        Vlans in spanning tree forwarding state and not pruned
Et0/3       1,100,200
SWITCH#
4. trunk 포트에 VLAN 허용하기
e0/0 포트에 VLAN 100, 200번만 허용하려면,
SWITCH#conf t
Enter configuration commands, one per line.  End with CNTL/Z.
SWITCH(config)#int e0/0
SWITCH(config-if)#switchport trunk allowed vlan 100,200
SWITCH(config-if)#end
확인해 보면,
SWITCH#sh int trunk
...
Port        Vlans allowed on trunk
Et0/0       100,200
Et0/1       1-4094
Et0/2       1-4094
Et0/3       1-4094

...
포트 0/3 번에서 4~10 번 vlan을 제거하는 방법
SWITCH#conf t
Enter configuration commands, one per line.  End with CNTL/Z.
SWITCH(config)#int e0/3
SWITCH(config-if)#switchport trunk allowed vlan remove 4-10
SWITCH(config-if)#
SWITCH(config-if)#end
확인해 보면,
SWITCH#sh int trunk
...
Port        Vlans allowed on trunk
Et0/0       100,200
Et0/1       1-4094
Et0/2       1-4094
Et0/3       1-3,11-4094
다시 0/3 포트에 모든 Vlan을 허용하려면,
SWITCH#conf t
Enter configuration commands, one per line.  End with CNTL/Z.
SWITCH(config)#int e0/3
SWITCH(config-if)#switchport trunk allowed vlan all
SWITCH(config-if)#end
확인해 보면,
SWITCH#sh int trunk
...

Port        Vlans allowed on trunk
Et0/0       100,200
Et0/1       1-4094
Et0/2       1-4094
Et0/3       1-4094

...
5. Trunk 포트의 native VLAN 변경하기
트렁크 포트의 native vlan을 지정하지 않으면, native vlan은 1로 설정되어 있다. 아래와같이 변경한다.
<pre class="lang:sh highlight:0 decode:true " >SWITCH#conf t
Enter configuration commands, one per line.  End with CNTL/Z.
SWITCH(config)#int e0/0
SWITCH(config-if)#switchport trunk native vlan 100
SWITCH(config-if)#end
SWITCH#</pre>
설정을 확인해 보면,
SWITCH#sh run int e0/0
Building configuration...

Current configuration : 176 bytes
!
interface Ethernet0/0
 switchport trunk encapsulation dot1q
 switchport trunk native vlan 100
 switchport trunk allowed vlan 100,200
 switchport mode trunk
 duplex auto
end
6. 라우터 설정
Fox vlan과 Cats vlan이 통신 가능하도록 라우터를 설정한다. 이때, VLAN 100에 해당하는 네트워크는 sub interface로 잡지 않도록 주의한다.
router#conf t
Enter configuration commands, one per line.  End with CNTL/Z.
router(config)# ip routing
router(config)#int e0/0
router(config-if)# ip address 192.168.10.1 255.255.255.0
router(config)#int e0/0.200
router(config-subif)#encapsulation dot1Q 200
router(config-subif)#ip address 192.168.20.1 255.255.255.0
router(config-subif)#end
7. 스위치 vlan 인터페이스와 default gateway 설정
각 vlan에 IP 주소를 설정한다.
SWITCH#conf t
Enter configuration commands, one per line.  End with CNTL/Z.
SWITCH(config)#int vlan 100
SWITCH(config-if)# ip address 192.168.10.2 255.255.255.0
SWITCH(config-if)# int vlan 200
SWITCH(config-if)# ip address 192.168.20.2 255.255.255.0
SWITCH(config-if)# end
스위치의 default gateway를 라우터로 설정해준다.
SWITCH(config)#ip default-gateway 192.168.10.1
여기까지 설정한후, 두 VLAN 사이의 통신을 확인해 본다. 라우터 설정이 잘 되었다면 아래처럼 두 VLAN간의 통신에 문제가 없다.
VPCS> sh ip

NAME        : VPCS[1]
IP/MASK     : 192.168.20.12/24
GATEWAY     : 192.168.20.1
DNS         :
MAC         : 00:50:79:66:68:03
LPORT       : 10014
RHOST:PORT  : 127.0.0.1:10015
MTU:        : 1500

VPCS> ping 192.168.10.11
192.168.10.11 icmp_seq=1 timeout
192.168.10.11 icmp_seq=2 timeout
84 bytes from 192.168.10.11 icmp_seq=3 ttl=63 time=0.873 ms
84 bytes from 192.168.10.11 icmp_seq=4 ttl=63 time=1.343 ms
84 bytes from 192.168.10.11 icmp_seq=5 ttl=63 time=1.072 ms

VPCS>
—————
라우터의 최종 설정
—————
router#sh run
Building configuration...

Current configuration : 1930 bytes
!
! Last configuration change at 07:45:13 UTC Tue Dec 12 2017
version 15.2
service timestamps debug datetime msec
service timestamps log datetime msec
no service password-encryption
!
hostname router
!
boot-start-marker
boot-end-marker
!
!
!
no aaa new-model
mmi polling-interval 60
no mmi auto-configure
no mmi pvc
mmi snmp-timeout 180
no ip icmp rate-limit unreachable
!
!
!
!
!
!
no ip domain lookup
ip cef
no ipv6 cef
!
multilink bundle-name authenticated
!
!
!
!
!
!
!
!
!
redundancy
!
!
ip tcp synwait-time 5
!
!
!
!
!
!
!
!
!
!
!
!
interface Ethernet0/0
 ip address 192.168.10.1 255.255.255.0
!
interface Ethernet0/0.100
!
interface Ethernet0/0.200
 encapsulation dot1Q 200
 ip address 192.168.20.1 255.255.255.0
!
interface Ethernet0/1
 no ip address
 shutdown
!
interface Ethernet0/2
 no ip address
 shutdown
!
interface Ethernet0/3
 no ip address
 shutdown
!
interface Ethernet1/0
 no ip address
 shutdown
!
interface Ethernet1/1
 no ip address
 shutdown
!
interface Ethernet1/2
 no ip address
 shutdown
!
interface Ethernet1/3
 no ip address
 shutdown
!
interface Serial2/0
 no ip address
 shutdown
 serial restart-delay 0
!
interface Serial2/1
 no ip address
 shutdown
 serial restart-delay 0
!
interface Serial2/2
 no ip address
 shutdown
 serial restart-delay 0
!
interface Serial2/3
 no ip address
 shutdown
 serial restart-delay 0
!
interface Serial3/0
 no ip address
 shutdown
 serial restart-delay 0
!
interface Serial3/1
 no ip address
 shutdown
 serial restart-delay 0
!
interface Serial3/2
 no ip address
 shutdown
 serial restart-delay 0
!
interface Serial3/3
 no ip address
 shutdown
 serial restart-delay 0
!
ip forward-protocol nd
!
!
no ip http server
no ip http secure-server
!
!
!
!
control-plane
!
!
!
!
!
!
!
line con 0
 exec-timeout 0 0
 privilege level 15
 logging synchronous
line aux 0
 exec-timeout 0 0
 privilege level 15
 logging synchronous
line vty 0 4
 login
 transport input all
!
!
end

router#
————
스위치 최종 설정
————
SWITCH#sh run
Building configuration...

Current configuration : 2389 bytes
!
! Last configuration change at 07:36:30 UTC Tue Dec 12 2017
!
version 15.1
service timestamps debug datetime msec
service timestamps log datetime msec
no service password-encryption
service compress-config
!
hostname SWITCH
!
boot-start-marker
boot-end-marker
!
!
logging discriminator EXCESS severity drops 6 msg-body drops EXCESSCOLL
logging buffered 50000
logging console discriminator EXCESS
!
no aaa new-model
no ip routing
no ip icmp rate-limit unreachable
!
no ip cef
!
!
no ip domain-lookup
no ipv6 cef
ipv6 multicast rpf use-bgp
!
!
!
!
!
!
!
spanning-tree mode pvst
spanning-tree extend system-id
!
!
!
!
vlan internal allocation policy ascending
!
ip tcp synwait-time 5
!
!
!
!
!
!
!
!
!
interface Ethernet0/0
 switchport trunk encapsulation dot1q
 switchport trunk native vlan 100
 switchport trunk allowed vlan 100,200
 switchport mode trunk
 duplex auto
!
interface Ethernet0/1
 switchport trunk encapsulation dot1q
 switchport mode trunk
 duplex auto
!
interface Ethernet0/2
 switchport trunk encapsulation dot1q
 switchport mode trunk
 duplex auto
!
interface Ethernet0/3
 switchport trunk encapsulation dot1q
 switchport mode trunk
 duplex auto
!
interface Ethernet1/0
 switchport access vlan 100
 switchport mode access
 duplex auto
!
interface Ethernet1/1
 switchport access vlan 100
 switchport mode access
 duplex auto
!
interface Ethernet1/2
 duplex auto
!
interface Ethernet1/3
 duplex auto
!
interface Ethernet2/0
 switchport access vlan 200
 switchport mode access
 duplex auto
!
interface Ethernet2/1
 switchport access vlan 200
 switchport mode access
 duplex auto
!
interface Ethernet2/2
 switchport access vlan 200
 switchport mode access
 duplex auto
!
interface Ethernet2/3
 switchport access vlan 200
 switchport mode access
 duplex auto
!
interface Ethernet3/0
 duplex auto
!
interface Ethernet3/1
 duplex auto
!
interface Ethernet3/2
 duplex auto
!
interface Ethernet3/3
 duplex auto
!
interface Vlan1
 no ip address
 no ip route-cache
 shutdown
!
interface Vlan100
 ip address 192.168.10.2 255.255.255.0
 no ip route-cache
!
interface Vlan200
 ip address 192.168.20.2 255.255.255.0
 no ip route-cache
!
ip default-gateway 192.168.10.1
!
no ip http server
!
!
!
!
!
control-plane
!
!
line con 0
 exec-timeout 0 0
 privilege level 15
 logging synchronous
line aux 0
 exec-timeout 0 0
 privilege level 15
 logging synchronous
line vty 0 4
 login
!
end

SWITCH#
8. L3스위치로 IVR 설정하기
L3스위치의 라우팅 기능을 이용하여 VLAN사이의 라우팅을 구현한다. 위의 구성에서 라우터가 필요 없기 때문에 라우터를 제거하고 아래 그림 처럼 구성한다.

VLAN 인터페이스에 아이피주소를 다시 할당한다. 라우터를 제거했고, 스위치가 라우터의 IP주소를 가지게 된다.
SWITCH#conf t
Enter configuration commands, one per line.  End with CNTL/Z.
SWITCH(config)#int vlan 100
SWITCH(config-if)#no ip address 192.168.10.2 255.255.255.0
SWITCH(config-if)#ip address 192.168.10.1 255.255.255.0
SWITCH(config-if)#int vlan 200
SWITCH(config-if)#no ip address 192.168.20.2 255.255.255.0
SWITCH(config-if)#ip address 192.168.20.1 255.255.255.0
SWITCH(config-if)#end
스위치의 라우터 기능을 활성화한다.
SWITCH#conf t
Enter configuration commands, one per line.  End with CNTL/Z.
SWITCH(config)#ip routing
SWITCH(config)#end
이제, VLAN 100에 속한 VPCS2에서, VLAN 200에 속한 VPCS-3 까지 ping 시험을 해 본다.
VPCS> sh ip

NAME        : VPCS[1]
IP/MASK     : 192.168.10.12/24
GATEWAY     : 192.168.10.1
DNS         :
MAC         : 00:50:79:66:68:01
LPORT       : 10010
RHOST:PORT  : 127.0.0.1:10011
MTU:        : 1500

VPCS> ping 192.168.20.12
84 bytes from 192.168.20.12 icmp_seq=1 ttl=63 time=4.291 ms
84 bytes from 192.168.20.12 icmp_seq=2 ttl=63 time=1.332 ms
84 bytes from 192.168.20.12 icmp_seq=3 ttl=63 time=1.500 ms
84 bytes from 192.168.20.12 icmp_seq=4 ttl=63 time=1.235 ms
84 bytes from 192.168.20.12 icmp_seq=5 ttl=63 time=1.113 ms

VPCS>
잘 된다!
————–
스위치 최종 설정
————–
SWITCH#sh run
Building configuration...

Current configuration : 2253 bytes
!
version 15.1
service timestamps debug datetime msec
service timestamps log datetime msec
no service password-encryption
service compress-config
!
hostname SWITCH
!
boot-start-marker
boot-end-marker
!
!
logging discriminator EXCESS severity drops 6 msg-body drops EXCESSCOLL
logging buffered 50000
logging console discriminator EXCESS
!
no aaa new-model
no ip icmp rate-limit unreachable
!
ip cef
!
!
no ip domain-lookup
no ipv6 cef
ipv6 multicast rpf use-bgp
!
!
!
!
!
!
!
spanning-tree mode pvst
spanning-tree extend system-id
!
!
!
!
vlan internal allocation policy ascending
!
ip tcp synwait-time 5
!
!
!
!
!
!
!
!
!
interface Ethernet0/0
 switchport trunk encapsulation dot1q
 switchport trunk native vlan 100
 switchport trunk allowed vlan 100,200
 switchport mode trunk
 duplex auto
!
interface Ethernet0/1
 switchport trunk encapsulation dot1q
 switchport mode trunk
 duplex auto
!
interface Ethernet0/2
 switchport trunk encapsulation dot1q
 switchport mode trunk
 duplex auto
!
interface Ethernet0/3
 switchport trunk encapsulation dot1q
 switchport mode trunk
 duplex auto
!
interface Ethernet1/0
 switchport access vlan 100
 switchport mode access
 duplex auto
!
interface Ethernet1/1
 switchport access vlan 100
 switchport mode access
 duplex auto
!
interface Ethernet1/2
 duplex auto
!
interface Ethernet1/3
 duplex auto
!
interface Ethernet2/0
 switchport access vlan 200
 switchport mode access
 duplex auto
!
interface Ethernet2/1
 switchport access vlan 200
 switchport mode access
 duplex auto
!
interface Ethernet2/2
 switchport access vlan 200
 switchport mode access
 duplex auto
!
interface Ethernet2/3
 switchport access vlan 200
 switchport mode access
 duplex auto
!
interface Ethernet3/0
 duplex auto
!
interface Ethernet3/1
 duplex auto
!
interface Ethernet3/2
 duplex auto
!
interface Ethernet3/3
 duplex auto
!
interface Vlan1
 no ip address
 shutdown
!
interface Vlan100
 ip address 192.168.10.1 255.255.255.0
!
interface Vlan200
 ip address 192.168.20.1 255.255.255.0
!
ip default-gateway 192.168.10.1
!
no ip http server
!
!
!
!
!
control-plane
!
!
line con 0
 exec-timeout 0 0
 privilege level 15
 logging synchronous
line aux 0
 exec-timeout 0 0
 privilege level 15
 logging synchronous
line vty 0 4
 login
!
end

SWITCH#
1 comment
와우 유익한 정보 감사합니다. 저도 해봤는데 잘되네요^^
제가 직접 해본거 제 블로그에도 포스팅 하겠습니다.
감사합니다~~