
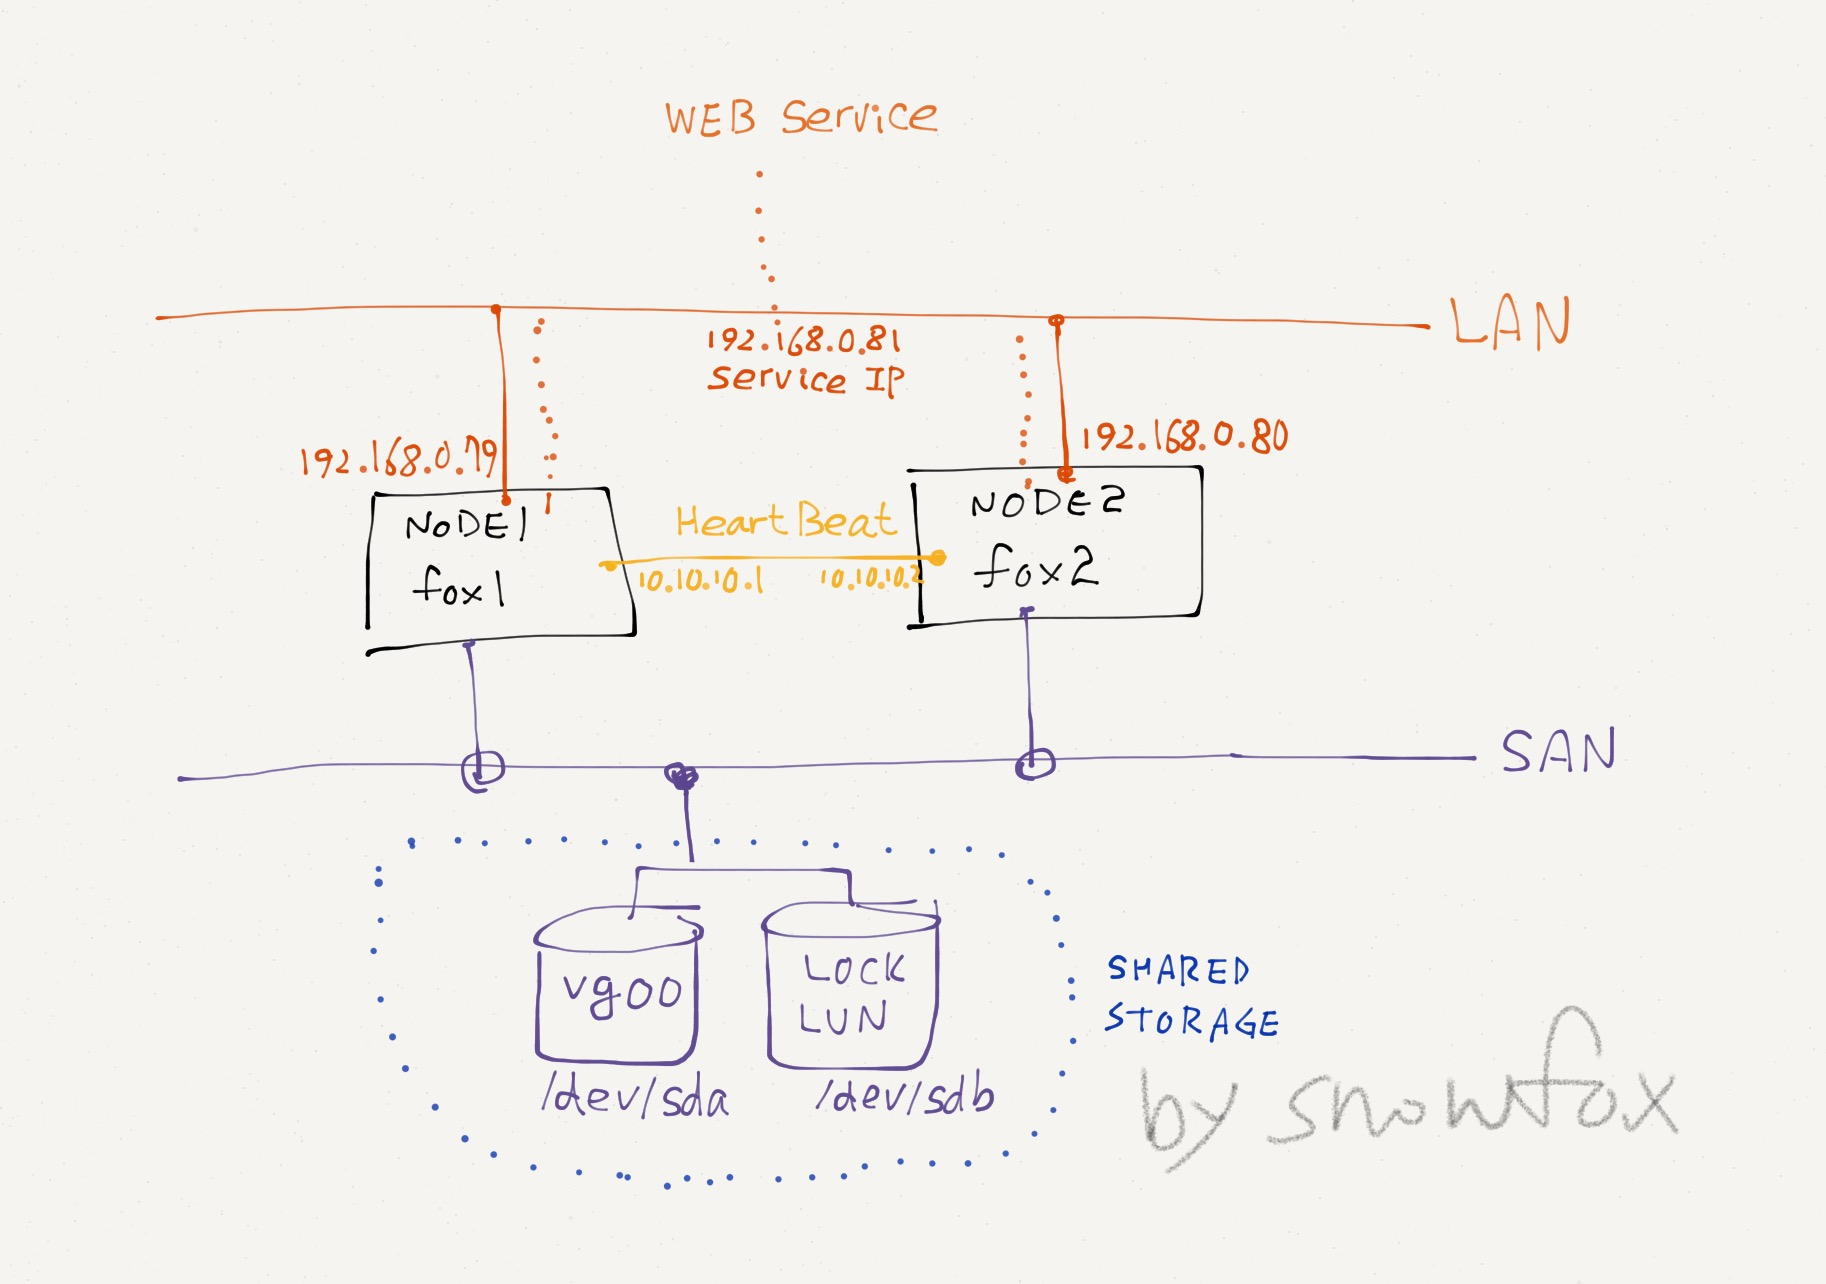
클러스터 구성 환경
Node1:
OS: CentOS6.6
eth0: 192.168.0.79
eth1: 10.10.10.1
hostname: fox1
Node2
OS: CentOS6.6
eth0: 192.168.0.80
eth1: 10.10.10.2
hostname: fox2
ServiceIP: 192.168.0.81
Shared Storage
1GB: lock lun용
53GB: data 용
MCSG vsrsion: A.12.00.00_Base_for_Red_Hat_Enterprise_Linux_6_BB094-11001
아래 그림과 같이 구성.
1. mc service guard 설치전 필요한 패키지 설치
# yum install lm_sensors tog-pegasus authd krb5-libs zlib libblkid net-snmp sg3_utils sg3_utils-libs xinetd libnl mdadm udev lsscsi
커널이 2.6.18.128 이상이면 libnl 도 설치한다.
# yum install libnl
컴파일러 설치: 모듈을 설치할때 컴파일러가 필요하다.
# yum groupinstall "Development tools"
2. 클러스터들 사이에 시간 동기호를 위해 ntp를 설치 , 설정한다.
# yum install ntp
# ntpdate -u time.nist.gov
3. /etc/hosts 화일에 아래 내용을 추가한다
[root@fox1 ~]# cat /etc/hosts
192.168.0.79    fox1
192.168.0.80    fox2
192.168.0.81    foxs

10.10.10.1      fox1_h  # MCSG heartbeat
10.10.10.2      fox2_h  # MCSG heartbeat
4. 패키지 설치
cd 또는 image 화일을 마운트 하고 MCSG 패키지를 설치한다.
# cd /mnt/RedHat/RedHat6/Serviceguard/x86_64
# rpm -ivh *.rpm
5. .bashrc 화일에 아래 내용을 추가하고, 적용한다.
# vi /root/.bashrc
PATH=$PATH:/usr/local/cmcluster/bin
. /etc/cmcluster.conf

# source .bashrc
6. 클러스터 노드를 등록한다.
# vi /usr/local/cmcluster/conf/cmclnodelist
fox1 root
fox2 root
7. Lock LUN 만들기(Node1 에서)
디스크확인(1GB 디스크를 lock lun으로 만든다).
# fdisk /dev/sdb
Command (m for help): p
Command (m for help): n
Partition number (1-4): 1
Last cylinder, +cylinders or +size{K,M,G} (1-1011, default 1011): 1011
Command (m for help): w
다른노드에서도 변경된 파티션을 읽기위해 아래 커맨드를 실행한다.
# sfdisk -R /dev/sdb
8. Quorum server 설치, 설정
# cd /mnt/RedHat/RedHat6/QuorumServer/x86_64
# rpm -ivh serviceguard-qs-A.12.00.00-0.rhel6.x86_64.rpm
# vi /usr/local/qs/conf/qs_authfile
fox1
fox2
9. MCSG saftiy timer module 컴파일, 설치
# cd /usr/local/cmcluster/drivers
# make modules
  CC [M]  /usr/local/cmcluster/drivers/deadman.o
  Building modules, stage 2.
  MODPOST 1 modules
  CC      /usr/local/cmcluster/drivers/deadman.mod.o
  LD [M]  /usr/local/cmcluster/drivers/deadman.ko.unsigned
  NO SIGN [M] /usr/local/cmcluster/drivers/deadman.ko

# make modules_install
  INSTALL /usr/local/cmcluster/drivers/deadman.ko
  DEPMOD  2.6.32-504.8.1.el6.x86_64
설치한 모듈을 커널에 로드한다.
# modprobe deadman
9. 클러스터 설정.
아래 커맨드로 클러스터 설정화일을 생성한다.
# cd /usr/local/cmcluster/conf
# cmquerycl -n fox1 -n fox2 -C cluster1.conf.dist
# grep -v -e ^# -e ^$ cluster1.conf.dist > cluster1.conf
cluster1.conf에 LOCK LUN을 추가해준다.
# vi cluster1.conf
CLUSTER_NAME            fox_cluster
HOSTNAME_ADDRESS_FAMILY         IPV4

NODE_NAME               fox1
  NETWORK_INTERFACE     eth0
    HEARTBEAT_IP        192.168.0.79
  NETWORK_INTERFACE     eth1
    HEARTBEAT_IP        10.10.10.1
CLUSTER_LOCK_LUN        /dev/sdb1

NODE_NAME               fox2
  NETWORK_INTERFACE     eth0
    HEARTBEAT_IP        192.168.0.80
  NETWORK_INTERFACE     eth1
    HEARTBEAT_IP        10.10.10.2
CLUSTER_LOCK_LUN        /dev/sdb1

MEMBER_TIMEOUT          14000000
AUTO_START_TIMEOUT      600000000
NETWORK_POLLING_INTERVAL        2000000
SUBNET 192.168.0.0
  IP_MONITOR OFF
SUBNET 10.10.10.0
  IP_MONITOR OFF
MAX_CONFIGURED_PACKAGES         3
USER_NAME       ANY_USER
USER_HOST       ANY_SERVICEGUARD_NODE
USER_ROLE       MONITOR
설정화일을 node2로 복사한다.
# scp cmclnodelist fox2:/usr/local/cmcluster/conf
# scp cluster1.conf fox2:/usr/local/cmcluster/conf
# scp cmcluster.rc fox2:/usr/local/cmcluster/conf
주의)
module이 설치되지 않았을경우에, 아래와 같은 오류가 발생한다.
# cmquerycl -n fox1 -n fox2 -C cluster1.conf.dist > /dev/null
Unable to receive reply from local cmclconfd. Connection timed out
Unable to initialize HOSTNAME_ADDRESS_FAMILY.
아래와 같은 오류가 발생했다면, iptables(방화벽)가 실행중인지 확인한다.
# cmquerycl -n fox1 -n fox2 -C cluster1.conf.distx
Warning: Unable to determine local domain name for fox1
ERROR: Node fox2 is refusing Serviceguard communication.
Please make sure that the proper security access is configured on node
fox2 through either file-based authorization(pre-A.11.16 version) or
access control policies (version A.11.16 or higher)
and/or that the host name lookup on node fox2
resolves the IP address correctly.
Please make sure that cmclnodelist on node fox2 has entries
for all the nodes in the cluster.
Failed to gather configuration information.
10. 클러스터 데몬 실행
클러스터 설정을 확인하고, 적용한다.
# cmcheckconf -C cluster1.conf
# cmapplyconf -k -C cluster1.conf
자동으로 클러스터에 join 하기 위해 /usr/local/cmcluster/conf/cmcluster.rc 화일에 아래 내용을 수정한다.
#AUTOSTART_CMCLD=0
AUTOSTART_CMCLD=1
양쪽 노드에서 동시에 아래 커맨드로 클러스터 데몬을 실행한다.
# /etc/init.d/cmcluster.init start
주의)
설정확인에 아래와 같은 오류가나온다면, 재부팅한다.
# cmcheckconf -C cluster1.conf
MAX_CONFIGURED_PACKAGES configured to 3.
MAX_CONFIGURED_PACKAGES configured to 3.
WARNING: Unable to obtain host IO timeout setting. Assigning the most conservative value 70000000...
WARNING: Unable to obtain host IO timeout setting. Assigning the most conservative value 70000000...
ERROR: /dev/sdb1 is not a valid device. Validation failed.
ERROR: Invalid data for cluster lock LUN configuration
cmcheckconf: Unable to verify cluster file: cluster1.conf.
11. Shared VG 만들기
남아있는 /dev/sda에 LV를 만들고, 화일시스템을 생성하여 shared storage로 사용한다. 10GB lv를 만들고 xfs 화일시스템을 만든다.
만든 화일시스템을 /fox 에 마운트 해 보고, vg를 비활성으로 만든다.
# pvcreate /dev/sda
# vgcreate vg00 /dev/sda
# lvcreate -L 10G -n foxlv vg00
# mkfs -t xfs /dev/vg00/foxlv
# mkdir /fox
# mount /dev/vg00/foxlv /fox
# umount /fox
# vgchange -a n /dev/vg00
12. PKG 설정
cmmakepkg 커맨드로 템플릿 패키지를 만든다.
# cd /usr/local/cmcluster/conf/pkg
# cmmakepkg pkg1.conf
설정항목이 많고, 복잡하므로 자세한 사항은 문서를 참고해야 한다. 꼭 필요한 부분만 발췌하면 아래와 비슷할 것이다.
package_name pkg1
package_description                     "Serviceguard Package"
module_name                     sg/basic
module_version                  1
module_name                     sg/all
module_version                  2
module_name                     sg/failover
module_version                  1
module_name                     sg/priority
module_version                  1
#module_name                    sg/pr_cntl
#module_version                 2
module_name                     sg/dependency
module_version                  1
module_name                     sg/weight
module_version                  1
module_name                     sg/monitor_subnet
module_version                  1
module_name                     sg/package_ip
module_version                  1
module_name                     sg/service
module_version                  1
module_name                     sg/generic_resource
module_version                  1
module_name                     sg/volume_group
module_version                  1
module_name                     sg/filesystem
module_version                  1
module_name                     sg/pev
module_version                  1
module_name                     sg/external_pre
module_version                  1
module_name                     sg/external
module_version                  1
module_name                     sg/acp
module_version                  1
package_type                    failover
node_name       fox1
node_name       fox2
auto_run                        yes
node_fail_fast_enabled                  no
run_script_timeout                      no_timeout
halt_script_timeout                     no_timeout
successor_halt_timeout                  no_timeout
script_log_file                 $SGRUN/log/$SG_PACKAGE.log
operation_sequence                      $SGCONF/scripts/sg/external_pre.sh
#operation_sequence                     $SGCONF/scripts/sg/pr_cntl.sh
operation_sequence                      $SGCONF/scripts/sg/volume_group.sh
operation_sequence                      $SGCONF/scripts/sg/filesystem.sh
operation_sequence                      $SGCONF/scripts/sg/package_ip.sh
operation_sequence                      $SGCONF/scripts/sg/external.sh
operation_sequence                      $SGCONF/scripts/sg/service.sh
failover_policy                 configured_node
failback_policy                 manual
priority                        no_priority
monitored_subnet        192.168.0.0
monitored_subnet_access full
ip_subnet       192.168.0.0
ip_subnet_node  fox1
ip_subnet_node  fox2
ip_address      192.168.0.81 # SERVICE IP
vgchange_cmd                    "vgchange -a y"
vxvol_cmd                       "vxvol -g \${DiskGroup} startall"
vg vg00
vxvm_dg_retry                   no
deactivation_retry_count                        2
kill_processes_accessing_raw_devices                    no
concurrent_fsck_operations                      1
concurrent_mount_and_umount_operations                  1
fs_mount_retry_count                    0
fs_umount_retry_count                   1
fs_name         /dev/vg00/foxlv
fs_server       ""
fs_directory    /fox
fs_type         "xfs"
fs_mount_opt    ""
fs_umount_opt   ""
fs_fsck_opt     ""
설정을 마쳤으면, 설정을 검사하고, 적용한다.
# cmcheckconf -v -P pkg.conf
# cmapplyconf -P pkg.conf
주의)
이때, 다음과 같은 오류가 발생하여 PR_mode를 사용하지 않도록 pkg1.conf 을 수정했다.
ERROR: In package pkg1 :/dev/sda1 does not support Persistent Reservations
       Persistent Reservations disabled for package pkg1
       In some configurations this may result in data
       corruption under certain conditions.  Please
       check the documentation for more details.
PR_mode:DISABLED
이 오류는 LUN device가 WERO를 지원하지 않아서 발생한다.
#module_name                    sg/pr_cntl
#module_version                 2
#operation_sequence                     $SGCONF/scripts/sg/pr_cntl.sh
또는 sg_persist 커맨드로 pr_mode를 disable 할 수 있는듯 하다.(확실하지 않음)
13. 클러스터 실행
아래 커맨드로 클러스터 상태를 확인한다.
# cmviewcl

CLUSTER STATUS
fox_cluster down

NODE STATUS STATE
fox1 down unknown
fox2 down unknown

UNOWNED_PACKAGES

PACKAGE STATUS STATE AUTO_RUN NODE
pkg1 down halted enabled unowned
클러스터를 실행하고, 확인한다.
# cmruncl -f
cmruncl: Validating network configuration...
cmruncl: Network validation complete
cmruncl: Validating cluster lock disk .... Done
Checking for license.........
Found Valid Instant ON License
Days Remaining before Expiration:88
Waiting for cluster to form .... done
Cluster successfully formed.
Check the syslog files on all nodes in the cluster to verify that no warnings occurred during startup.
# cmviewcl

CLUSTER        STATUS
fox_cluster    up

  NODE           STATUS       STATE
  fox1           up           running

    PACKAGE        STATUS           STATE            AUTO_RUN    NODE
    pkg1           up               running          enabled     fox1

  NODE           STATUS       STATE
  fox2           up           running
14. 클러스터에 서비스 등록하기(여기서는 apache 웹서버)
방법은 apache웹서버 와 데이터 모두 shared storage를 사용하는 방법과, 데이터만 shared storage에 사용하는 방법이 있다. 나는 간단하게 데이터만 shared storage를 사용하기로 했다. 이경우는, 양쪽 노드에 httpd를 설치해야한다. 설치는 yum으로 설치했으며 방법은 생략한다.
아파치 웹서버의 DocumentRoot를 shared storage 로 설정한다(httpd.conf 수정). 나는 아래와 같이 설정했다.
DocumentRoot "/fox/html/"
아파치 웹서버 시작 스크립트를 만든다.(템플릿 화일을 원하는 이름으로 복사한 후 아파시 시작/종료 스크립트를 넣어주면 된다)
# cp /usr/local/cmcluster/conf/pkg/external_script.template /usr/local/cmcluster/conf/pkg/apache
# chmod 755 /usr/local/cmcluster/conf/pkg/apache
# scp /usr/local/cmcluster/conf/pkg/apache fox2:/usr/local/cmcluster/conf/pkg/apache
아래부분에 해당 스크립트를 넣어준다.
# vi /usr/local/cmcluster/conf/pkg/apache
 function start_command
{
    sg_log 5 "start_command"
    # ADD your package start steps here
    /etc/init.d/httpd start
    return 0
}
function stop_command
{
    sg_log 5 "stop_command"
    # ADD your package halt steps here
    /etc/init.d/httpd stop
    return 0
}
설정값을 적용한다.
# cmcheckconf -P pkg.conf
On node fox1, validation of package pkg1 succeeded with:
Verifying if the IP addresses could be added to corresponding subnets
On node fox2, validation of package pkg1 succeeded with:
Verifying if the IP addresses could be added to corresponding subnets
Checking for license.........
Found Valid Instant ON License
Days Remaining before Expiration:88
Use the cmapplyconf command to apply the configuration.

# cmapplyconf -P pkg.conf
On node fox2, validation of package pkg1 succeeded with:
Verifying if the IP addresses could be added to corresponding subnets
On node fox1, validation of package pkg1 succeeded with:
Verifying if the IP addresses could be added to corresponding subnets
Checking for license.........
Found Valid Instant ON License
Days Remaining before Expiration:88

One or more of the specified packages are running.
After command completion, check the following to ensure
the configuration changes completed successfully:
1. Any failures logged in syslog and package log files.
2. Packages for which configuration changes failed will have
   online_modification_failed flag set to "yes" in cmviewcl -f line output
Modify the package configuration ([y]/n)? y
Completed the cluster update
15. 테스트
클러스터 확인하고, 서비스(httpd)를 확인한 후, 노드 fox1을 정지시켜 서비스가 fox2로 이전되는지 확인한다.
# cmviewcl

CLUSTER        STATUS
fox_cluster    up

  NODE           STATUS       STATE
  fox1           up           running

    PACKAGE        STATUS           STATE            AUTO_RUN    NODE
    pkg1           up               running          enabled     fox1

  NODE           STATUS       STATE
  fox2           up           running

# cmhaltnode -f fox1
Disabling all packages from starting on nodes to be halted.
Warning:  Do not modify or enable packages until the halt operation is completed.
Disabling automatic failover for failover packages to be halted.
Halting package pkg1
Successfully halted package pkg1
Waiting for nodes to halt ..... done
Successfully halted all nodes specified.
Halt operation complete.

# cmviewcl

CLUSTER        STATUS
fox_cluster    up

  NODE           STATUS       STATE
  fox1           down         halted
  fox2           up           running

    PACKAGE        STATUS           STATE            AUTO_RUN    NODE
    pkg1           up               running          enabled     fox2
# cmviewcl

CLUSTER        STATUS
fox_cluster    up

  NODE           STATUS       STATE
  fox1           up           running

    PACKAGE        STATUS           STATE            AUTO_RUN    NODE
    pkg1           up               running          enabled     fox1

  NODE           STATUS       STATE
  fox2           up           running
node fox2에서 서비스 확인
# df -h
Filesystem            Size  Used Avail Use% Mounted on
/dev/vda1             7.8G  1.3G  6.2G  17% /
tmpfs                 499M     0  499M   0% /dev/shm
/dev/mapper/vg00-foxlv
                       10G   33M   10G   1% /fox
# ps -ef | grep -i http
root      4152     1  0 16:05 ?        00:00:00 /usr/sbin/httpd
apache    4154  4152  0 16:05 ?        00:00:00 /usr/sbin/httpd
apache    4155  4152  0 16:05 ?        00:00:00 /usr/sbin/httpd
apache    4157  4152  0 16:05 ?        00:00:00 /usr/sbin/httpd
apache    4158  4152  0 16:05 ?        00:00:00 /usr/sbin/httpd
apache    4159  4152  0 16:05 ?        00:00:00 /usr/sbin/httpd
apache    4160  4152  0 16:05 ?        00:00:00 /usr/sbin/httpd
apache    4161  4152  0 16:05 ?        00:00:00 /usr/sbin/httpd
apache    4162  4152  0 16:05 ?        00:00:00 /usr/sbin/httpd
root      4173  2175  0 16:07 pts/0    00:00:00 grep -i http
16. MCSG manager 설치
MCSG 매니저는 fox1에 설치한다.
iso 이미지는 /mnt에 마운트되어 있다.
먼저, sun java를 설치한 후
# yum install jre-8u40-linux-x64.rpm
# rpm -ivh /mnt/RedHat/RedHat6/SGManager/x86_64/serviceguard-manager-B.12.00.00-0.linux.noarch.rpm
Preparing...                ########################################### [100%]
   1:serviceguard-manager   ########################################### [100%]
Please run /opt/hp/cmcluster/serviceguardmanager/Serviceguard_manager_setup [-u] [-l {jetty location}]> [-o config] | [-l {jetty location}] [-o config]
If LDAP setup is not available then export the sgmgr user password to SGMGR_ENV variable and then run the above script with -u option
MCSG manager는 jetty WAS를 사용하므로, jetty가 먼저 설치되어야 한다.
jetty를 다운로드 받아서 /opt 아래에 압축을 푼다.
# cd /opt
# wget http://download.eclipse.org/jetty/stable-9/dist/jetty-distribution-9.2.9.v20150224.tar.gz
mv jetty-distribution-9.2.9.v20150224 jetty
SG manager를 실행한다.
# /Serviceguard_manager_setup -o config -l /opt/jetty
Restarting Jetty Server
Could not create sgmgr user as the environment variable SGMGR_ENV is not set.Set the env variable and rerun the setup script.
sgmr user가 없으므로, 만들어준다.(id와 passwd를 모두 sgmgr로 만들었다)
# useradd sgmgr
# passwd sgmgr
SGMGR 설정하면, jetty 가 자동으로 실행된다.
# cd /opt/hp/cmcluster/serviceguardmanager
# ./Serviceguard_manager_setup -o config -l /opt/jetty
Restarting Jetty Server

# service-sgmgr status
# service jetty-sgmgr status
Checking arguments to Jetty:
START_INI      =  /opt/jetty/start.ini
JETTY_HOME     =  /opt/jetty
JETTY_CONF     =  /opt/jetty/etc/jetty.conf
JETTY_PID      =  /var/run/jetty.pid
JETTY_START    =  /opt/jetty/start.jar
JETTY_LOGS     =
CONFIGS        =  etc/jetty-logging.xml etc/jetty-started.xml
CLASSPATH      =
JAVA           =  /usr/bin/java
JAVA_OPTIONS   =  -Djetty.state=/opt/jetty/jetty.state -Djetty.home=/opt/jetty -Djava.io.tmpdir=/tmp
JETTY_ARGS     =
RUN_CMD        =  /usr/bin/java -Djetty.state=/opt/jetty/jetty.state -Djetty.home=/opt/jetty -Djava.io.tmpdir=/tmp -jar /opt/jetty/start.jar etc/jetty-logging.xml etc/jetty-started.xml
Jetty running pid=11625
ps 커맨드로 jetty 서버가 잘 실행되고 있는지 확인하고, 웹브라우저로 접속한다.
https://192.168.0.79:5522
이때 id/passwdord는 위에서 설정한 sgmgr 을 읿력한다. 그러면, 아래와 같은 화면을 볼 수 있다.
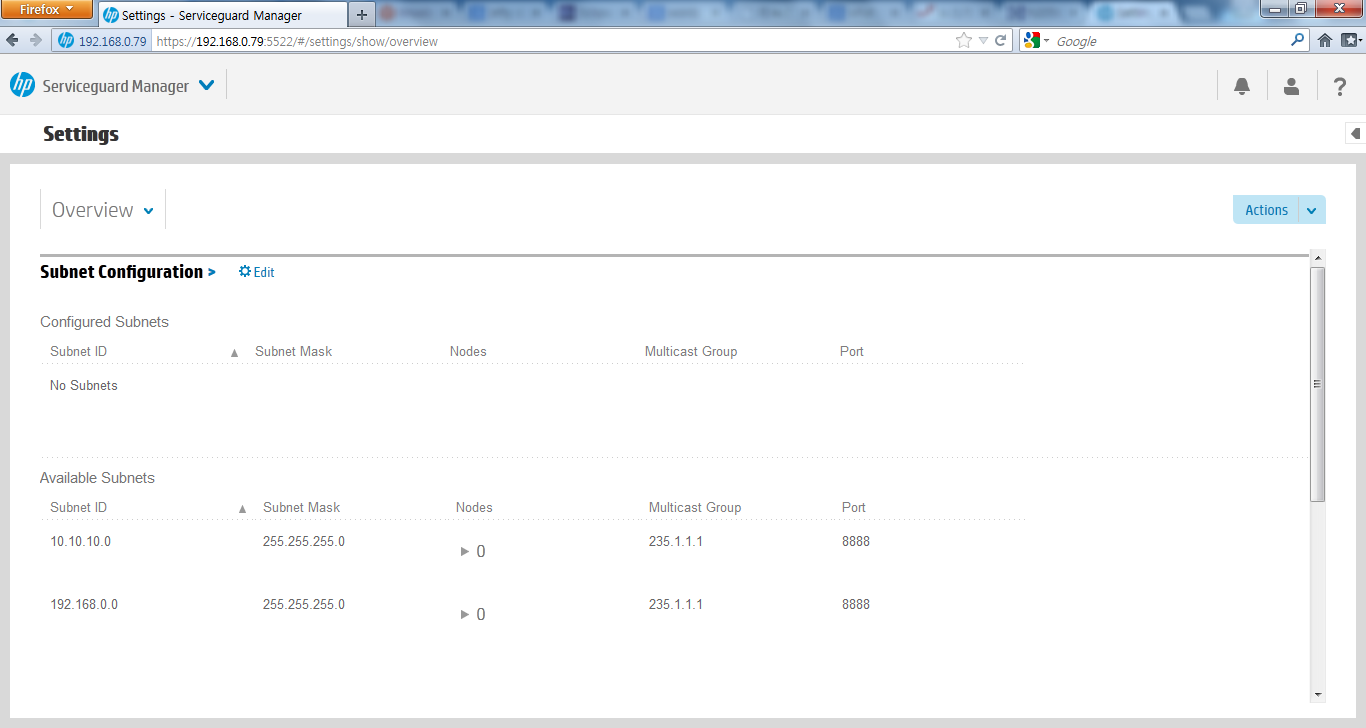
참고문서: http://h20565.www2.hp.com/hpsc/doc/public/display?docId=emr_na-c04403704-1
9 comments
Skip to comment form
혹시 스토리지 대신에 서버로 iscsi 사용해서 볼륨 공유해주는 방법으로도 가능할까요??
혹시 스토리지 대신 서버로 iscsi 사용해서 볼륨 공유해주는 방법으로도 가능 할까요??
Author
가능합니다. 단, iSCSI 볼륨은 클러스터에 참여하지 않는 서버를 사용해야 failover 처리같은것에 문제 없습니다.
넵 답변 감사합니다. 한 가지 더 여쭤볼게 있는데 혹시 A.12.00.00_Base_for_Red_Hat_Enterprise_Linux_6_BB094-11001.iso 파일은
hp사이트에서 유료로 다운받아야 되는건가요??
구글링 해봤는데 안나오는것 같아가지구요…
Author
평가판 무료로 받았었습니다. 꽤 오래 전이라 지금은 어떤지 모르겠네요.
Author
지금 찾아보니 이름이 바뀐거 같아요. SGLX로 hpe software center에서 검색 해 보셔요.
감사합니다! 찾아서 다운받았습니다ㅎ
한가지 더 여쭤볼게 있는데 다운받은 파일이 rhel 8, 9 용 이라서 rhel 8.1 에
구성해보려고 하는데 위에 내용으로 똑같이 설정하면 될까요??
버젼이 달라서 문제 될게 있는지 궁금합니다.
Author
그것까지는 모르겠네요. 버전 올라가면서 크게 바뀌는 경우도 있어서… 일단 시도 해 보시고, 안되면 해당 버전 문서를 찾아 보셔야 할겁니다.