
CentOS 8 , Nagios 설치하기.
설치환경
OS: CentOS8, selinux disabled
firewalld: 사용안함.
IP 주소: 192.168.0.3
1. Nagios 설치에 필요한 패키지를 설치한다.
컴파일러 설치
# yum group install "development tools"
Nagios 설치에 필요한 패키지를 설치.
# yum install httpd php php-cli net-snmp net-snmp-utils epel-release postfix
2. Nagios 다운로드
글쓰는 시점의 최신버전은 4.4.6이며, 이 버전의 소스코드를 다운로드한다.
# wget https://github.com/NagiosEnterprises/nagioscore/releases/download/nagios-4.4.6/nagios-4.4.6.tar.gz
3. Nagios 컴파일 및 설치
소스 코드의 압축을 푼다.
# tar xvzpf nagios-4.4.6.tar.gz
압축을 해제한 디렉토리로 이동한다.
# cd nagios-4.4.6
configure에 옵션을 주지 않으면 아래와 같은 화면을 볼 수 있다. 즉, 기본 설치 위치가 /usr/local/nagios 가 된다.
# ./configure
...
*** Configuration summary for nagios 4.4.6 2020-04-28 ***:

 General Options:
 -------------------------
        Nagios executable:  nagios
        Nagios user/group:  nagios,nagios
       Command user/group:  nagios,nagios
             Event Broker:  yes
        Install ${prefix}:  /usr/local/nagios
    Install ${includedir}:  /usr/local/nagios/include/nagios
                Lock file:  /run/nagios.lock
   Check result directory:  /usr/local/nagios/var/spool/checkresults
           Init directory:  /lib/systemd/system
  Apache conf.d directory:  /etc/httpd/conf.d
             Mail program:  /usr/sbin/sendmail
                  Host OS:  linux-gnu
          IOBroker Method:  epoll

 Web Interface Options:
 ------------------------
                 HTML URL:  http://localhost/nagios/
                  CGI URL:  http://localhost/nagios/cgi-bin/
 Traceroute (used by WAP):
설치 디렉토리를 바꾸고 싶다면, –prefix 옵션을 주어 다시 컴파일 환경을 설정한다. 나는 /opt/nagios에 설치하기 위해 아래 옵션을 주었다.
# ./configure --prefix=/opt/nagios
...

Creating sample config files in sample-config/ ...


*** Configuration summary for nagios 4.4.6 2020-04-28 ***:

 General Options:
 -------------------------
        Nagios executable:  nagios
        Nagios user/group:  nagios,nagios
       Command user/group:  nagios,nagios
             Event Broker:  yes
        Install ${prefix}:  /opt/nagios
    Install ${includedir}:  /opt/nagios/include/nagios
                Lock file:  /run/nagios.lock
   Check result directory:  /opt/nagios/var/spool/checkresults
           Init directory:  /lib/systemd/system
  Apache conf.d directory:  /etc/httpd/conf.d
             Mail program:  /usr/sbin/sendmail
                  Host OS:  linux-gnu
          IOBroker Method:  epoll

 Web Interface Options:
 ------------------------
                 HTML URL:  http://localhost/nagios/
                  CGI URL:  http://localhost/nagios/cgi-bin/
 Traceroute (used by WAP):


Review the options above for accuracy.  If they look okay,
type 'make all' to compile the main program and CGIs.
make 명령어로 컴파일한다. 컴파일이 끝나면 아래와 같이 설치 옵션을 보여준다.
# make all
...
*** Compile finished ***
If the main program and CGIs compiled without any errors, you
can continue with testing or installing Nagios as follows (type
'make' without any arguments for a list of all possible options):
make test
- This runs the test suite
make install
- This installs the main program, CGIs, and HTML files
make install-init
- This installs the init script in /lib/systemd/system
make install-daemoninit
- This will initialize the init script
in /lib/systemd/system
make install-groups-users
- This adds the users and groups if they do not exist
make install-commandmode
- This installs and configures permissions on the
directory for holding the external command file
make install-config
- This installs *SAMPLE* config files in /opt/nagios/etc
You'll have to modify these sample files before you can
use Nagios. Read the HTML documentation for more info
on doing this. Pay particular attention to the docs on
object configuration files, as they determine what/how
things get monitored!
make install-webconf
- This installs the Apache config file for the Nagios
web interface
make install-exfoliation
- This installs the Exfoliation theme for the Nagios
web interface
make install-classicui
- This installs the classic theme for the Nagios
web interface
*** Support Notes *******************************************
If you have questions about configuring or running Nagios,
please make sure that you:
- Look at the sample config files
- Read the documentation on the Nagios Library at:
before you post a question to one of the mailing lists.
Also make sure to include pertinent information that could
help others help you. This might include:
- What version of Nagios you are using
- What version of the plugins you are using
- Relevant snippets from your config files
- Relevant error messages from the Nagios log file
For more information on obtaining support for Nagios, visit:
*************************************************************
Enjoy.
install 하기 전에, nagoos 사용자와 그룹을 만든다.
# groupadd nagios
# useradd -g nagios nagios
컴파일된 nagios 바이너리 파일을 설치한다.
# make install
# ls -l /opt/
total 0
drwxr-xr-x 7 root root 68 Aug 18 00:06 nagios
/opt 디렉토리 아래에, nagios가 설치된 것을 볼 수 있다.
nagios 는 외부 어플리케이션의 명령을 처리할 수 있다. 아래 명령을 내리면 외부 명령 디렉토리를 만들고 퍼미션이 조정된다.
# make install-commandmode
/usr/bin/install -c -m 775 -o nagios -g nagios -d /opt/nagios/var/rw
chmod g+s /opt/nagios/var/rw

# ls -l /opt/nagios/var
total 0
..
drwxrwsr-x 2 nagios nagios  6 Aug 18 00:09 rw
..
nagios 예제 설정 파일을 설치한다.
# make install-config
아파치 설정 파일을 설치한다.
# make install-webconf
/usr/bin/install -c -m 644 sample-config/httpd.conf /etc/httpd/conf.d/nagios.conf
if [ 0 -eq 1 ]; then \
        ln -s /etc/httpd/conf.d/nagios.conf /etc/apache2/sites-enabled/nagios.conf; \
fi

*** Nagios/Apache conf file installed ***
systemd 가 nagios 서비스를 제어할 수 있도록 unit 파일을 만들고, 확인 해 본다.
# make install-daemoninit
# systemctl status nagios
● nagios.service - Nagios Core 4.4.6
   Loaded: loaded (/usr/lib/systemd/system/nagios.service; enabled; vendor preset: disabled)
   Active: inactive (dead)
     Docs: https://www.nagios.org/documentation
nagiosadmin 웹 페이지에 접속 할 수 있도록 계정을 만든다. nagios 대신 다른 ID로 바꾸려면, 아래 명령어에서 nagios 대신 원하는 ID를 사용하면 된다.
# htpasswd -c /opt/nagios/etc/htpasswd.users nagios
New password:
Re-type new password:
Adding password for user nagios
apache 웹서버를 재 실행 하고, 재부팅 후에도 실행되도록 등록한다.
# systemctl restart httpd
# systemctl enable httpd
3. Nagios 플러그인을 설치한다.
먼저, 플러그인을 다운로드 받는다. 현 시점에서 최신 버전은 2.3.3 이다. 플러그인은 /opt/nagios/libexec 디렉토리 아래에 설치된다.
# cd
# wget https://nagios-plugins.org/download/nagios-plugins-2.3.3.tar.gz

압축을 풀고, 압축푼 디렉토리로 이동한다.
# tar xvzpf nagios-plugins-2.3.3.tar.gz
# cd nagios-plugins-2.3.3
# ./configure --frefix=/opt/nagios
# make
# make install
이제, nagios 서비스를 실행한다.
# systemctl start nagios
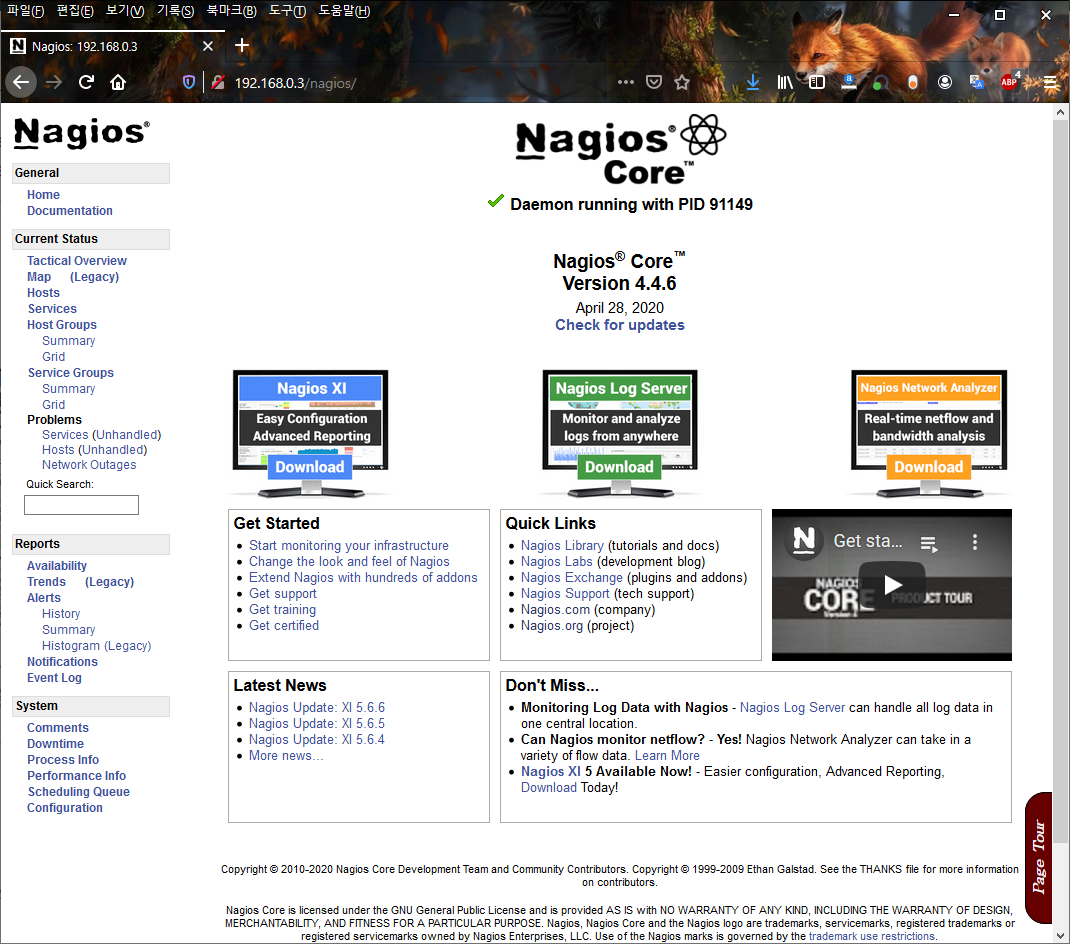
웹브라우저를 실행하고, nagios 페이지에 접속하면, ID, Password를 물어본다. 위의 htpasswd로 설정한 ID 와 비밀번호를 입력하면,
아래와 같은 nagios 초기 화면을 볼 수 있을 것이다.
 l
l
참고문서:
https://linuxize.com/post/how-to-install-and-configure-nagios-on-centos-7/
https://github.com/nagios-plugins/nagios-plugins