
Nornir 네트워크 자동화 – 1 (기초편)
1. Nornir란 무엇인가?
Nornir는 파이썬으로 작성된 자동화 프레임워크다. Ansible의 경우 파이썬으로 작성되었지만 프로그래밍을 몰라도 사용하는데 문제는 없지만, Nornir를 사용하려면 파이썬 프로그래밍을 알아야한다.
Nornir는 파이썬 버전 3.6.2 이상에서 동작한다.
2. Nornir 설치
Nornir는 PyPI에 게시되며, 다른 파이썬 패키지들처럼 pip 명령으로 설치가 가능하다. 또한 개발단계에서는 virtual environment를 사용하는것이 좋다.
아래 명령으로 설치한다.
(venv) $ pip install nornir
설치후 파이썬 쉘에서 Nornir 시험해본다.
$ python
Python 3.8.5 (default, Jan 27 2021, 15:41:15)
[GCC 9.3.0] on linux
Type "help", "copyright", "credits" or "license" for more information.
>>> from nornir import InitNornir
>>>
오류가 발생하지 않는다면 잘 설치된 것이다.
3. Nornir 초기화
InitNornir 함수를 이용하여 Nornir를 초기화 한다. 초기화에는 설정파일을 이용할 수도 있고, 파이썬 코드를 사용할 수도 있으며 두가지를 조합하여 사용할 수도 있다.
* 설정파일 작성 – 설정파일은 yaml 포맷으로 작성한다. 여기에서는 설정파일 이름을 config.yaml로 했다.(다른 이름을 사용해도 된다.)
아래와 같이 config.yaml 파일을 작성한다.
$ vi config.yaml
---
inventory:
    plugin: SimpleInventory
    options:
        host_file: 'hosts.yaml'
        group_file: 'groups.yaml'
        defaults_file: 'defaults.yaml'

runner:
    plugin: threaded
    options:
        num_workers: 10
* 설정파일로 Nornir 초기화하기.
아래는 config.yaml 파일로 Nornir를 초기화한후에 worker 개수를 확인하는 파이썬 코드이다.
from nornir import InitNornir
nr = InitNornir(config_file='config.yaml')
nr.config.runner.options['num_workers']
위 코드를 파이썬 쉘에서 실행하면 10 이 보인다.
* 설정파일 없이 초기화하기(파이썬 코드작성)
nr = InitNornir(
    runner={
        'plugin': 'threaded',
        'options': {
            'num_workers': 10,
        }
    },
    inventory={
        'plugin': 'SimpleInventory',
        'options': {
            'host_file': 'hosts.yaml',
            'group_file': 'groups.yaml',
        }
    }
)
nr.config.runner.options['num_workers']
파이썬 쉘에서 실행한 결과는 동일하다.
* 위의 두 가지를 조합해서 사용하는 방법
nr = InitNornir(
    config_file='config.yaml',
    runner={
        'plugin': 'threaded',
        'options': {
            'num_workers': 40,
        }
    },
)
 nr.config.runner.options['num_workers']
위 코드에서는 설정파일의 num_workers는 10이나 InitNornir 파라메터로 숫자를 40으로 변경했으므로, 실행결과는 40 이 된다.
4. 인벤토리
인벤토리는 hosts, groups, defaults로 구성된다. 여기에서는 SimpleInventory 플러그인을 사용한다.
SimpleInventory 플러그인은 세개의 파일(hosts.yaml, groups.yaml, defaults.yaml)에 관련 데이타를 저장한다.
* hosts 파일: hosts 파일은 가장 바깥쪽(왼쪽)의 키가 host 이름과 개체에 연결된 구조로, 아래 코드를 실행하면 host 개체의 스키마를 볼 수 있다.
from nornir.core.inventory import Host, Group
import json

print(json.dumps(Host.schema(), indent=4))
실행 결과는,
{
    "name": "str",
    "connection_options": {
        "$connection_type": {
            "extras": {
                "$key": "$value"
            },
            "hostname": "str",
            "port": "int",
            "username": "str",
            "password": "str",
            "platform": "str"
        }
    },
    "groups": [
        "$group_name"
    ],
    "data": {
        "$key": "$value"
    },
    "hostname": "str",
    "port": "int",
    "username": "str",
    "password": "str",
    "platform": "str"
}
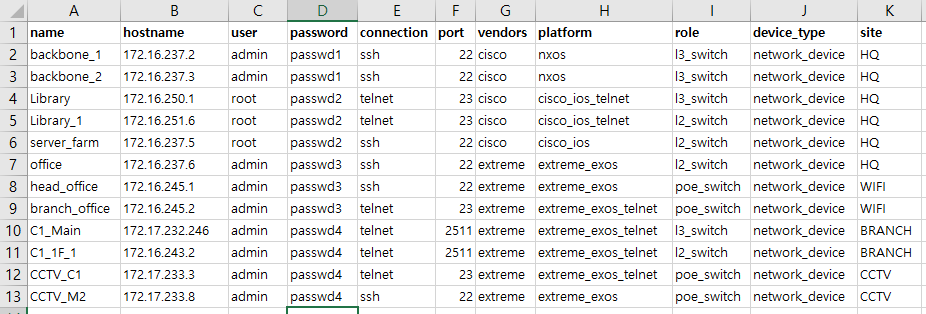
위의 스키마를 바탕으로 그림의 리스트를 hosts.yaml 파일을 만들면 아래와 비슷한 구조가 된다.
---
backbone_1:
    hostname: 172.16.237.2
    port: 22
    username: admin
    password: 'passwd1'
    platform: nxos
    data:
        site: HQ
        device_type: network_device
        role: l3_switch
        vendors: cisco

backbone_2:
    hostname: 172.16.237.3
    port: 22
    username: admin
    password: 'passwd1'
    platform: nxos
    data:
        site: HQ
        device_type: network_device
        role: l3_switch
        vendors: cisco

Library:
    hostname: 172.16.250.1
    port: 23
    username: root
    password: 'passwd2'
    platform: cisco_ios_telnet
    data:
      site: HQ
      device_type: network_device
      role: l3_switch
      vendors: cisco

Library_1:
    hostname: 172.16.251.6
    port: 23
    username: root
    password: 'passwd2'
    platform: cisco_ios_telnet
    data:
      site: HQ
      device_type: network_device
      role: l2_switch
      vendors: cisco

server_farm:
    hostname: 172.16.237.5
    port: 22
    username: root
    password: 'passwd2'
    platform: cisco_ios
    data:
      site: HQ
      device_type: network_device
      role: l2_switch
      vendors: cisco

office:
    hostname: 172.16.237.6
    port: 22
    username: admin
    password: 'passwd3'
    platform: extreme_exos
    data:
      site: HQ
      device_type: network_device
      role: l2_switch
      vendors: extreme


head_office:
    hostname: 172.16.245.1
    port: 22
    username: admin
    password: 'passwd3'
    platform: extreme_exos
    data:
      site: WIFI
      device_type: network_device
      role: poe_switch
      vendors: extreme

branch_office:
    hostname: 172.16.245.2
    port: 23
    username: admin
    password: 'passwd3'
    platform: extreme_exos_telnet
    data:
      site: WIFI
      device_type: network_device
      role: poe_switch
      vendors: extreme

C1_Main:
    hostname: 172.17.232.246
    port: 2511
    username: admin
    password: 'passwd4'
    platform: extreme_exos_telnet
    data:
      site: BRANCH
      device_type: network_device
      role: l3_switch
      vendors: extreme

C1_1F_1:
    hostname: 172.16.243.2
    port: 2511
    username: admin
    password: 'passwd4'
    platform: extreme_exos_telnet
    data:
      site: BRANCH
      device_type: network_device
      role: l2_switch
      vendors: extreme


CCTV_C1:
    hostname: 172.17.233.3
    port: 23
    username: admin
    password: 'passwd5'
    platform: extreme_exos_telnet
      site: CCTV
      device_type: network_device
      role: poe_switch
      vendors: extreme

CCTV_M2:
    hostname: 172.17.233.8
    port: 22
    username: admin
    password: 'passwd5'
    platform: extreme_exos
      site: CCTV
      device_type: network_device
      role: poe_switch
      vendors: extreme
* groups 파일: groups 파일은 hosts 파일과 동일한 구조를 가진다. 위에서 작성한 hosts파일에서 중복되는 부분을 group으로 만들 수 있다.
backbone_1, backbone_2 항복의 중복되는 부분을 Nexus 그룹으로 만들수 있는데, hosts파일과 group파일은 아래처럽 보일 것이다.
hosts.yaml
---
backbone_1:
    hostname: 172.16.237.2
    groups:
        - Nexus

backbone_2:
    hostname: 172.16.237.3
    groups:
        - Nexus

...
groups.yaml
---
Nexus:
    port: 22
    username: admin
    password: 'adminpasswd'
    platform: nxos
    data:
        site: HQ
        device_type: network_device
        role: l3_switch
        vendors: cisco

...
* defaults 파일: defaults파일은 host 파일과 동일한 스키마를 가지나 개별 요소를 나타내는 외부 키가 없다.
---
defaults:
    data:
        domain: boxcorea.com
    username: admin
    password: 'defaultpasswd'
* 인벤토리 접근하기.
인벤토리는 inventory 속성으로 접근할 수 있다.
from nornir import InitNornir
nr = InitNornir(config_file='config.yaml')

print(nr.inventory.hosts)
위 코드를 실행하면, 아래와 같은 결과를 볼 수 있다.
{'backbone_1': Host: backbone_1, 'backbone_2': Host: backbone_2, 'Library': Host: Library, 'Library_1': Host: Library_1, 'server_farm': Host: server_farm
, 'office': Host: office, 'head_office': Host: head_office, 'branch_office': Host: branch_office, 'C1_Main': Host: C1_Main, 'C1_1F_1': Host: C1_1F_1, 'CC
TV_C1': Host: CCTV_C1, 'CCTV_M2': Host: CCTV_M2}
인벤토리는 각 호스트와 그룹에 접근하는데있어 딕셔너리와 유사한 속성을 가진다.
print(nr.inventory.hosts)
{'backbone_1': Host: backbone_1, 'backbone_2': Host: backbone_2, 'wifi_backbone': Host: wifi_backbone, 'wifi_switch1': Host: wifi_switch1, 'seafox1': Host: seafox1}
print(nr.inventory.hosts['backbone_1'])

Host: backbone_1
hosts와 groups는 모두 아래처럼 keys() 메소드를 사용하여 접근 가능하다.
host = nr.inventory.hosts['backbone_1']
print(host.keys())

dict_keys(['site', 'device_type', 'role', 'vendors'])
* 모델의 상속
groups.yaml 파일에서 Cisco_telnet 그룹은 Cisco 그룹을 상속하여 port 만 다른 그룹을 만들 수 있다.
Cisco:
    port: 22
    username: root
    password: 'root_passwd'
    platform: cisco_ios_telnet
    data:
        site: HQ
        device_type: network_device
        role: l3_switch
        vendors: cisco

Cisco_telnet:
    groups:
        - Cisco
    port: 23
5. 인벤토리 필터
인벤토리에서 원하는 호스트를 골라내는 간단한 방법은 (key, value) 쌍을 이용하는 것이다. 아래와 같은 방법으로 WIFI에 해당하는 호스트를 골라 낼 수 있다.
host = nr.filter(site='WIFI').inventory.hosts.keys()
print(host)

dict_keys(['head_office', 'branch_office'])
(key, value) 쌍을 여러개 사용하는 것도 가능하며 필터를 여러번 사용하는 것도 가능하다
nr.filter(site='HQ', role='l2_switch').inventory.hosts.keys()

dict_keys(['Library_1', 'server_farm', 'office'])
filter를 여러번 사용해도 된다.
nr.filter(site='HQ').filter(role='l2_switch').inventory.hosts.keys()

dict_keys(['Library_1', 'server_farm', 'office'])
children_of_group 메소드를 사용할 수도 있다.
nr.inventory.children_of_group('Nexus')
{Host: backbone_2, Host: backbone_1}
이 외에 함수를 만들고 filter_func 파라메터를 주어 원하는 호스트를 골라낼 수도 있고,더 많은 경우의 수를 가지고 골라내기위해 filter object F 를 사용하는 방법도 있다.
6. Task
Task는 한 호스트를 위해 어떤 기능을 구현한 재사용 가능한 코드다.
네트워크 장치에서 task는 플러그인 설치를 통해서 실행이 가능하다. task를 이해하기 위해 리눅스 host를 추가하고 만들어본다.
hosts.yaml에 아래 호스트를 추가한다.
seafox1:
    hostname: 192.168.100.100
    username: fox
    password: 'private'
    platform: linux
    data:
        site: HQ
        device_type: host
        role: host
이제, 아래처럼 task 를 작성한다.
$ vi task.py

from nornir import InitNornir
from nornir_utils.plugins.functions import print_result
from nornir.core.task import Task, Result


nr = InitNornir()

nr = nr.filter(site='HQ', role='host')

def say_hello(task: Task) -> Result:
    return Result(
        host=task.host,
        result=f"{task.host.name} says hello world!"
    )

result = nr.run(task=say_hello)
print_result(result)
위에서 작성한 task를 실행하면 아래와 같은 결과를 볼 수 있다.
$ python task.py
say_hello***********************************************************************
* seafox1 ** changed : False ***************************************************
vvvv say_hello ** changed : False vvvvvvvvvvvvvvvvvvvvvvvvvvvvvvvvvvvvvvvvvvvvvv INFO
seafox1 says hello world!
^^^^ END say_hello ^^^^^^^^^^^^^^^^^^^^^^^^^^^^^^^^^^^^^^^^^^^^^^^^^^^^^^^^^^^^^
task 함수에 인수를 주어 기능을 확장할 수 있다. 위에서 만든 함수를 아래와 같이 변경하고 실행할때 인수를 준다.
def say_hello(task: Task, text: str) -> Result:
    return Result(
        host=task.host,
        result=f"{task.host.name} says {text}."
    )

result = nr.run(task=say_hello, text='Good to see you.', name='Task describe' )
print_result(result)
이제, 실행하면 아래와 같은 결과를 볼 수 있다.
$ python task.py
Task describe*******************************************************************
* seafox1 ** changed : False ***************************************************
vvvv Task describe ** changed : False vvvvvvvvvvvvvvvvvvvvvvvvvvvvvvvvvvvvvvvvvv INFO
seafox1 says Good to see you..
^^^^ END Task describe ^^^^^^^^^^^^^^^^^^^^^^^^^^^^^^^^^^^^^^^^^^^^^^^^^^^^^^^^^
run 함수에 name 인수를 주지 않으면 함수 이름이 기본값이 된다.
7. 그룹화된 Task
네트워크 장치에서 여러 명령을 내려야 한다면 어떻게 해야할까?
netmiko_send_command 는 하나의 명령어만 처리한다.
한번에 여러 가지 명령어를 실행하고 싶다면, task를 그룹화해서 사용할 수 있다.
아래는 cisco ios 장비에서 show hardware, show env all 명령을 실행하는 task다.
import logging

from nornir import InitNornir
from nornir.core.task import Task, Result
from nornir_utils.plugins.functions import print_result
from nornir_netmiko.tasks import netmiko_send_command


def ios_maintenance_task(task: Task, text: str) -> Result:
    task.run(
        name='HW Info.',
        task=netmiko_send_command,
        command_string='show hardware'
    )
    task.run(
        name='Check HW',
        task=netmiko_send_command,
        command_string='show env all'
    )
    return Result(
        host=task.host,
        result=f'{task.host}: ios device maintenance.{text}',
    )


if __name__ == '__main__':
    nr = InitNornir(config_file='config.yaml')
    nr = nr.filter(site='HQ', role='l2_switch', )
    result = nr.run(name='test', task=ios_maintenance_task, text='Maintenance')
    print_result(result, severity_level=logging.DEBUG)
위에서 작성한 코드를 실행하면 아래와 같은 결과를 볼 수 있다.
test****************************************************************************
* Library_1 ** changed : False *************************************************
vvvv test ** changed : False vvvvvvvvvvvvvvvvvvvvvvvvvvvvvvvvvvvvvvvvvvvvvvvvvvv INFO
Library_1: ios device maintenance.Maintenance
---- HW Info. ** changed : False ----------------------------------------------- INFO
Cisco IOS Software, C3550 Software (C3550-IPBASE-M), Version 12.2(44)SE6, RELEASE SOFTWARE (fc1)
Copyright (c) 1986-2009 by Cisco Systems, Inc.
Compiled Mon 09-Mar-09 14:33 by gereddy
Image text-base: 0x00003000, data-base: 0x00D32668

ROM: Bootstrap program is C3550 boot loader

lib_1F_1 uptime is 11 weeks, 4 days, 22 hours, 9 minutes
System returned to ROM by power-on
System restarted at 17:39:53 KST Sun Feb 21 2021
System image file is "flash:c3550-ipbase-mz.122-44.SE6.bin"

Cisco WS-C3550-48 (PowerPC) processor (revision L0) with 65526K/8192K bytes of memory.
Processor board ID CAT0818R0B9
Last reset from warm-reset
Running Layer2/3 Switching Image

Ethernet-controller 1 has 12 Fast Ethernet/IEEE 802.3 interfaces

Ethernet-controller 2 has 12 Fast Ethernet/IEEE 802.3 interfaces

Ethernet-controller 3 has 12 Fast Ethernet/IEEE 802.3 interfaces

Ethernet-controller 4 has 12 Fast Ethernet/IEEE 802.3 interfaces

Ethernet-controller 5 has 1 Gigabit Ethernet/IEEE 802.3 interface

Ethernet-controller 6 has 1 Gigabit Ethernet/IEEE 802.3 interface

48 FastEthernet interfaces
2 Gigabit Ethernet interfaces

The password-recovery mechanism is enabled.
384K bytes of flash-simulated NVRAM.
Base ethernet MAC Address: 00:11:20:39:E5:00
Motherboard assembly number: 73-5701-09
Power supply part number: 34-0967-02
Motherboard serial number: CAT08180H18
Power supply serial number: LIT0810016J
Model revision number: L0
Motherboard revision number: A0
Model number: WS-C3550-48-SMI
System serial number: CAT0818R0B9
Configuration register is 0x10F

---- Check HW ** changed : False ----------------------------------------------- INFO
FAN is OK
TEMPERATURE is OK
POWER is OK
RPS is NOT PRESENT

^^^^ END test ^^^^^^^^^^^^^^^^^^^^^^^^^^^^^^^^^^^^^^^^^^^^^^^^^^^^^^^^^^^^^^^^^^
* office ** changed : False ****************************************************
vvvv test ** changed : False vvvvvvvvvvvvvvvvvvvvvvvvvvvvvvvvvvvvvvvvvvvvvvvvvvv INFO
office: ios device maintenance.Maintenance
---- HW Info. ** changed : False ----------------------------------------------- INFO
%% Unrecognized command:  "show hardware"

---- Check HW ** changed : False ----------------------------------------------- INFO
%% Unrecognized command:  "show env all"

^^^^ END test ^^^^^^^^^^^^^^^^^^^^^^^^^^^^^^^^^^^^^^^^^^^^^^^^^^^^^^^^^^^^^^^^^^
* server_farm ** changed : False ***********************************************
vvvv test ** changed : False vvvvvvvvvvvvvvvvvvvvvvvvvvvvvvvvvvvvvvvvvvvvvvvvvvv INFO
server_farm: ios device maintenance.Maintenance
---- HW Info. ** changed : False ----------------------------------------------- INFO
Cisco IOS Software, IOS-XE Software, Catalyst L3 Switch Software (CAT3K_CAA-UNIVERSALK9-M), Version 03.03.04SE RELEASE SOFTWARE (fc3)
Technical Support: http://www.cisco.com/techsupport
Copyright (c) 1986-2014 by Cisco Systems, Inc.
Compiled Fri 29-Aug-14 22:22 by prod_rel_team


Cisco IOS-XE software, Copyright (c) 2005-2014 by cisco Systems, Inc.
All rights reserved.  Certain components of Cisco IOS-XE software are
licensed under the GNU General Public License ("GPL") Version 2.0.  The
software code licensed under GPL Version 2.0 is free software that comes
with ABSOLUTELY NO WARRANTY.  You can redistribute and/or modify such
GPL code under the terms of GPL Version 2.0.
(http://www.gnu.org/licenses/gpl-2.0.html) For more details, see the
documentation or "License Notice" file accompanying the IOS-XE software,
or the applicable URL provided on the flyer accompanying the IOS-XE
software.


ROM: IOS-XE ROMMON
BOOTLDR: CAT3K_CAA Boot Loader (CAT3K_CAA-HBOOT-M) Version 1.2, RELEASE SOFTWARE (P)

System_Node uptime is 1 year, 14 weeks, 5 days, 2 hours, 53 minutes
Uptime for this control processor is 1 year, 14 weeks, 5 days, 2 hours, 56 minutes
System returned to ROM by reload
System restarted at 12:59:59 KST Sat Feb 1 2020
System image file is "flash:packages.conf"
Last reload reason: reload


This product contains cryptographic features and is subject to United
States and local country laws governing import, export, transfer and
use. Delivery of Cisco cryptographic products does not imply
third-party authority to import, export, distribute or use encryption.
Importers, exporters, distributors and users are responsible for
compliance with U.S. and local country laws. By using this product you
agree to comply with applicable laws and regulations. If you are unable
to comply with U.S. and local laws, return this product immediately.

A summary of U.S. laws governing Cisco cryptographic products may be found at:
http://www.cisco.com/wwl/export/crypto/tool/stqrg.html

If you require further assistance please contact us by sending email to
export@cisco.com.

License Level: Ipbase
License Type: Permanent
Next reload license Level: Ipbase

cisco WS-C3650-48TD (MIPS) processor with 4194304K bytes of physical memory.
Processor board ID FDO1843E18T
3 Virtual Ethernet interfaces
50 Gigabit Ethernet interfaces
2 Ten Gigabit Ethernet interfaces
2048K bytes of non-volatile configuration memory.
4194304K bytes of physical memory.
250456K bytes of Crash Files at crashinfo:.
1609272K bytes of Flash at flash:.
0K bytes of Dummy USB Flash at usbflash0:.
0K bytes of  at webui:.

Base Ethernet MAC Address          : a0:ec:f9:2e:c9:80
Motherboard Assembly Number        : 73-15124-05
Motherboard Serial Number          : FDO18430XG4
Model Revision Number              : D0
Motherboard Revision Number        : A0
Model Number                       : WS-C3650-48TD
System Serial Number               : FDO1843E18T


Switch Ports Model              SW Version        SW Image              Mode
------ ----- -----              ----------        ----------            ----
*    1 52    WS-C3650-48TD      03.03.04SE        cat3k_caa-universalk9 INSTALL


Configuration register is 0x102

---- Check HW ** changed : False ----------------------------------------------- INFO
Switch 1 FAN 1 is OK
Switch 1 FAN 2 is OK
Switch 1 FAN 3 is OK
FAN PS-1 is OK
FAN PS-2 is NOT PRESENT
Switch 1: SYSTEM TEMPERATURE is OK
SW  PID                 Serial#     Status           Sys Pwr  PoE Pwr  Watts
--  ------------------  ----------  ---------------  -------  -------  -----
1A  PWR-C2-250WAC       LIT18290P1Y  OK              Good     Good     250
1B  Not Present

^^^^ END test ^^^^^^^^^^^^^^^^^^^^^^^^^^^^^^^^^^^^^^^^^^^^^^^^^^^^^^^^^^^^^^^^^^
8. 처리결과
처리결과를 보는 가장 간단한 방법은 nornir-util 패키지의 print_result 함수를 이용하는 것이다. 이것은 위의 코드에서 볼 수 있다.
사용방법은,
from nornir_utils.plugins.functions import print_result

...

print_result(result)
일부 호스트의 결과만 보려면,
print_result(result['Library_1'])
자세한 처리 결과를 이용하는 방법은 part-2 부분에서 다를 것이다.
참고문서:
https://nornir.readthedocs.io/en/latest/tutorial/index.html
https://blogs.cisco.com/developer/nornir-python-automation-framework
https://saidvandeklundert.net/2020-12-06-nornir/